
The May blog is all about quilling with a modern approach, much more to my liking. I really enjoyed making these and found the quilling process calming and something to keep my hands occupied when telly watching. I ended up making many more components than planned to use in future projects – miniature scenes, indoor fairy gardens, mandalas, box frames, 3D model work, cards and so much more. It does take time to make the many small parts needed but once made you can let your imagination run free. Now I need to decide which earrings to keep for myself, plant pot earrings have been on my to do list for a very long time, and the joy of these being quilled is that they are lightweight. I hope the finished makes inspire you to have a go.

Modern Quilling
Quilling is the art of creating designs by rolling, shaping and gluing strips of paper together, an art form of paper filigree that has been practiced for many centuries. Because of new tools, techniques, ideas and materials now available, it is making a comeback in the craft world as well as being affordable. All you need to get started is a beginner kit and spend time practicing coil making. Quilling strips are measured in millimetres (width), the wider the easier it is to quill (I used mostly 5mm/3mm strips). They also come in many colours, different lengths and gsm weights. Quilling can be used for keyrings, jewellery, decorative items, cards, 3D models and so much more.
Materials:
- Starter quilling kit – slotted quilling tool, awl, small scissors, template board/circle size ruler, paper quilling strips, curling coach, tweezers – different kits come with similar tools but all are suitable to begin with
- Extras/additional – doming mould (I managed without one by using a pen with ball end), other quilling pens (longer/wider nib), specialist quilling papers (pearl, metallic etc)
- PVA glue (add to a non-porous surface like a glass coaster and leave to dry a little/thicken so the glue becomes tackier, less time holding till it sticks)
- I also used – gel glue, fake flowers, white/black marker pen, thin cord, earring hooks, small plastic pudding dish, LED tealight, dried flowers, mini grapevine wreath, paper straws
Instructions:
Most projects begin with a coil. Take a paper strip and slide into the slot at the top of the quilling tool. With your dominant hand start rolling it around itself (using a curling coach – seen below – helps control the coil keeping it neat and flat, especially useful if making a larger coil). Continue rolling until you reach the end of the strip. Hold with your finger add a dab of glue and hold till it stays put without uncoiling.
A tight coil is a paper strip that is tightly rolled creating a compact circle with no space between the layers, after creating they are secured with a small dab of glue.
A loose coil is rolled in the same way but then released allowing the coil to open up before securing with glue. A loose coil is used as the basis for many shapes teardrop/eye/square/triangle or other shapes. The most basic shape is the teardrop by simply pinching a loose coil. Loose coils can also be placed into the template board for consistent sizing and help with shaping.
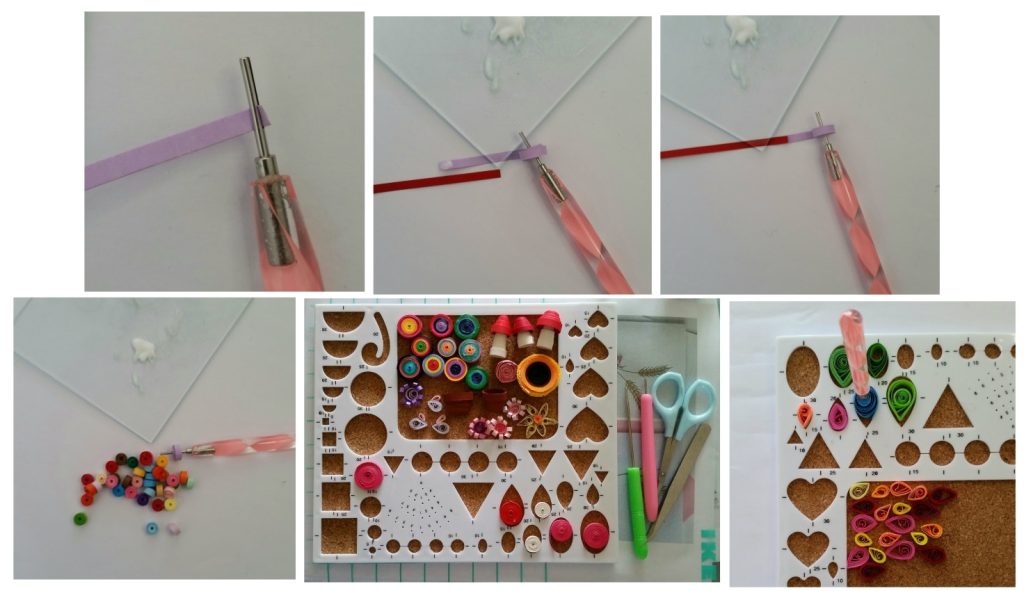
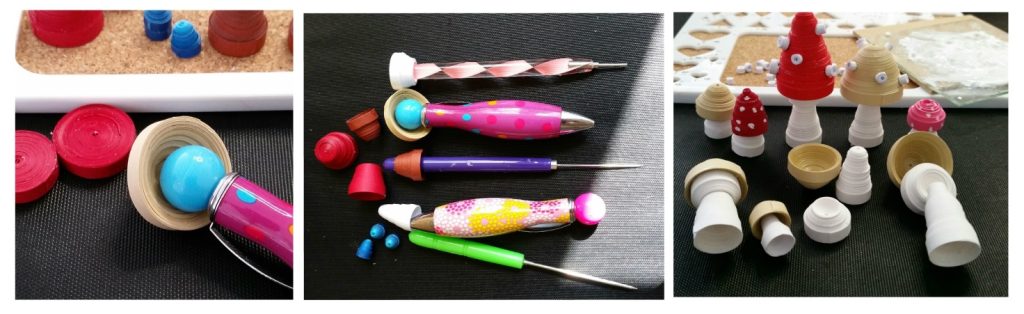
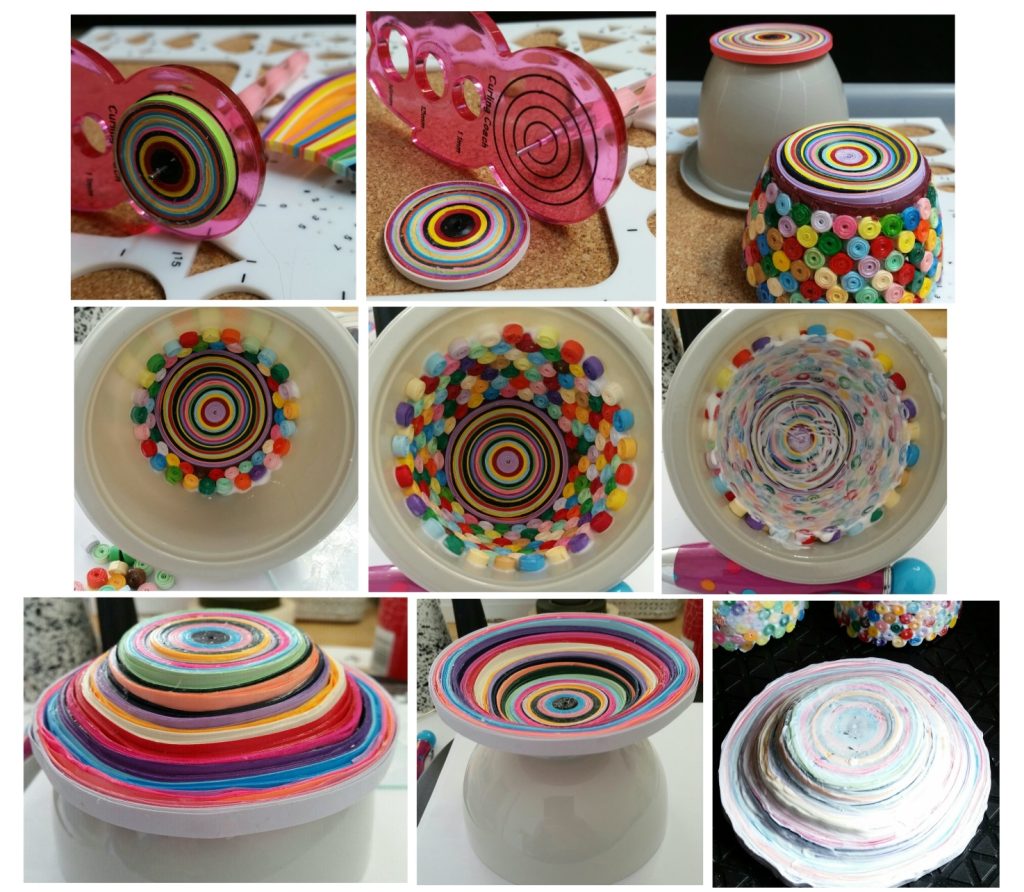
To create a 3D shape (plant pot/toadstool) it can be tricky. You need to make sure the coil has had time to dry fully so it doesn’t come apart. Roll a solid coil tightly with several 5mm wide or wider strips, once glued remove carefully from the quilling tool. I joined the strips together with a dab of glue (see above top right), and not glued to itself after each strip is added, this keeps the layers easier to manipulate into shape. This is then gently pushed and shaped inwards from the centre to create a domed/cupped effect. This can be done with a dome mould if you have one. I used the ball end of a pen I had stretching it over the ball slowly into shape.
For the plant pot press the dome/cup onto a solid surface to create a flat bottom so it stands without falling over. Keep shaping until you are happy. If it does come apart, as the strips are continuous, it can be rolled again to start over. Generously coat the inside with PVA glue and leave to dry to prevent it from collapsing. For the toadstool, shape as before and glue inside to maintain the rounded cap shape. I used the pointed side of the pen to create a pointed toadstool cap and also the stalk. You can use your finger or quilling tool to create a pointed shape also. For the larger toadstool only I created the frill with a smaller dome/cup and pushed into the top to make a cavity for the stalk (see below right). The smaller toadstools I added white marker pen dots, on the larger I added very small 3mm paper strip coils for the dots. Depending on how you intend to use these they may need a PVA coating on the outside.
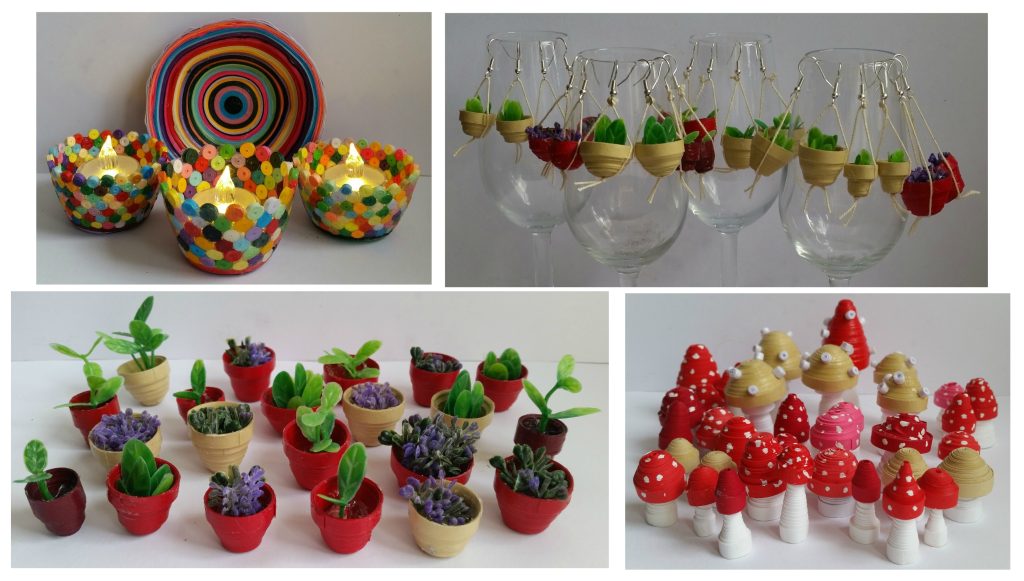
I made small trinket type dishes from single strip coils and a larger multi strip coil as shown below. I used the curling coach (previously mentioned) to make the larger coil. The larger coil was placed in a small plastic pudding basin, the small coils dipped in PVA and arranged around the sides. Glue was then generously added over this and left to mostly dry. This was then prised out by going between the quilling and basin with a sharp knife and eased out to leave to fully dry. The larger dish was a continuous larger coil shaped over a cereal bowl and glued to keep its shape although the layers did come apart a coating of glue firmed it up. Both were then glued inside and left to fully dry, then outside.
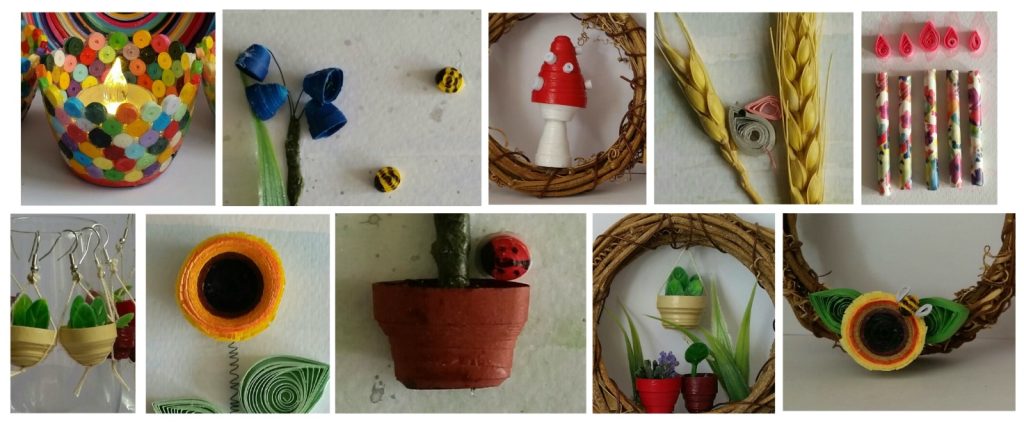
Below are more ideas to use your finished quilled shapes.

Close ups below to show details better. How cute is the mouse? The sunflower is frilled as the yellow strips were snipped into creating a fringe – fold up the strip to make shorter and then snip into one side.