

Starting on the 20th April we have a lovely long Easter Bank Holiday weekend so for this month we have a whimsical Easter Mad Hatter Tea Party theme. There are instructions on how to make a ‘floating’ teacup but if this is too daunting to try there is a simpler upside down teacup stand to use as a candle holder. There are additional instructions for repurposing and recycling food cans and wine bottles to add to the whimsical tea party display. They all look so lovely grouped together and will make a lovely Easter centre piece on the dining table or outside for al fresco dining if we have good weather (fingers crossed).

Easter Mad Hatter Tea Cups
The project for this month has a lovely whimsical feel. There is no direct link between Easter and ‘Alice’s Adventure in Wonderland’ but it is now a popular theme for events around this time with both children and adults. There are instructions on how to make a ‘floating’ teacup (a teacup that appears to be suspended in mid-air, achieved using a spoon/fork to create hidden support which is then decorated to disguise it). If this seems daunting to try out there is a simpler upside down teacup stand to use as a candle holder, display chocolate eggs, or even a small cake. There are additional instructions for repurposing/recycling food cans and wine bottles to add to the whimsical tea party display. All the projects would be lovely to use inside or out (hopefully the weather will be warmer by now) as part of your Easter/Spring celebrations.
Materials:
- Fine bone china teacup and saucer (nothing too heavy) – search out charity shops or ask around if anyone has any they no longer need/use
- Easily bendable teaspoon – I find a teaspoon because it is shorter gives better balance/equilibrium but you could use a fork to make the teacup ‘float’ higher
- Hot glue gun with plentiful amount of glue sticks, heavy duty glue gel (I used Pinflair which sticks just about anything and has no odour), PVA glue
- Light air dry clay – as an alternative you could use papier mache or glue soaked fabrics, anything that will dry hard and add bulk around the spoon
- Acrylic paints
- Decorative elements – fake grass, dried moss, miniature fairy garden décor, small eggs, twigs/picks/sprays, model leaf scatter, fabric flowers – anything in the right dimensions to decorate with
Instructions:
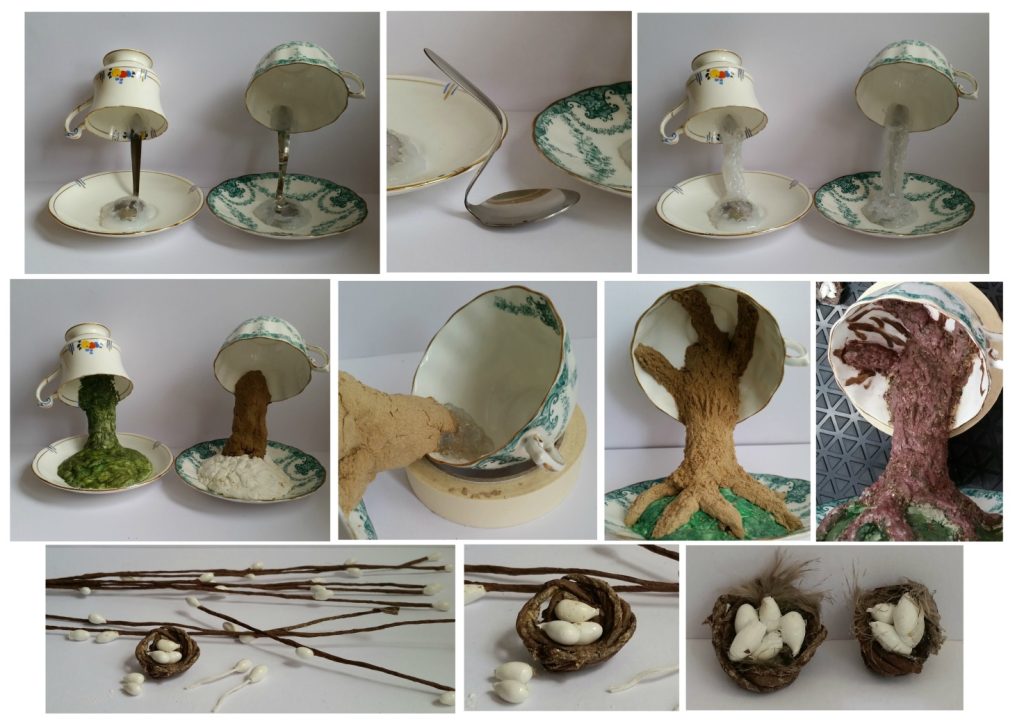
The first thing to do is to bend the spoon into a Z shape. Depending on the shape/size of your teacup/saucer it could be better to have the bowl of the spoon facing up or down. The spoon bowl is best glued to the saucer off centre to give better balance, the handle end goes inside the teacup. To bend, place the spoon on the edge of a hard surface and press into shape, use a small hammer if more force is needed. Place on the teacup/saucer to check the balance.
With a hot glue gun, glue the spoon bowl to the saucer with small applications each time, leaving to set/cool before adding more, the aim to cover fully adding bulk/width. Repeat for the handle end inside the teacup. Add hot glue around and down the spoon in a waterfall effect until you are happy with the coverage and thickness. Leave to set and fully cool down.
Test it is holding by lightly manhandling before proceeding further. If either end comes away remove the ‘waterfall’, add glue gel onto the glue formed flat parts, place back on again supporting until it starts to grip. I found lying the teacup on the inside of a roll of masking tape supported it well enough to leave to set.
Now to decorate but do handle gently supporting the teacup in the palm of your hand when possible. If at any time either end comes away glue back on with glue gel. It will eventually stay put!
Wrap light weight air dry clay around the ‘waterfall’ squeezing together until covered; add more to the saucer to create a mound. The clay may come away from the shiny surface, if it does add small squirts of PVA underneath and press down gently. Leave to dry for about 24-48 hours. Add a painted undercoat as this helps disguise any white of the clay that may show through the paint.
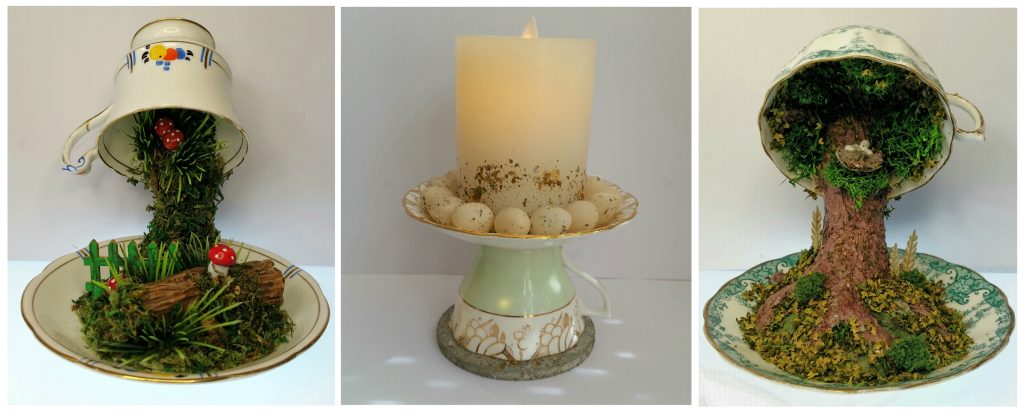
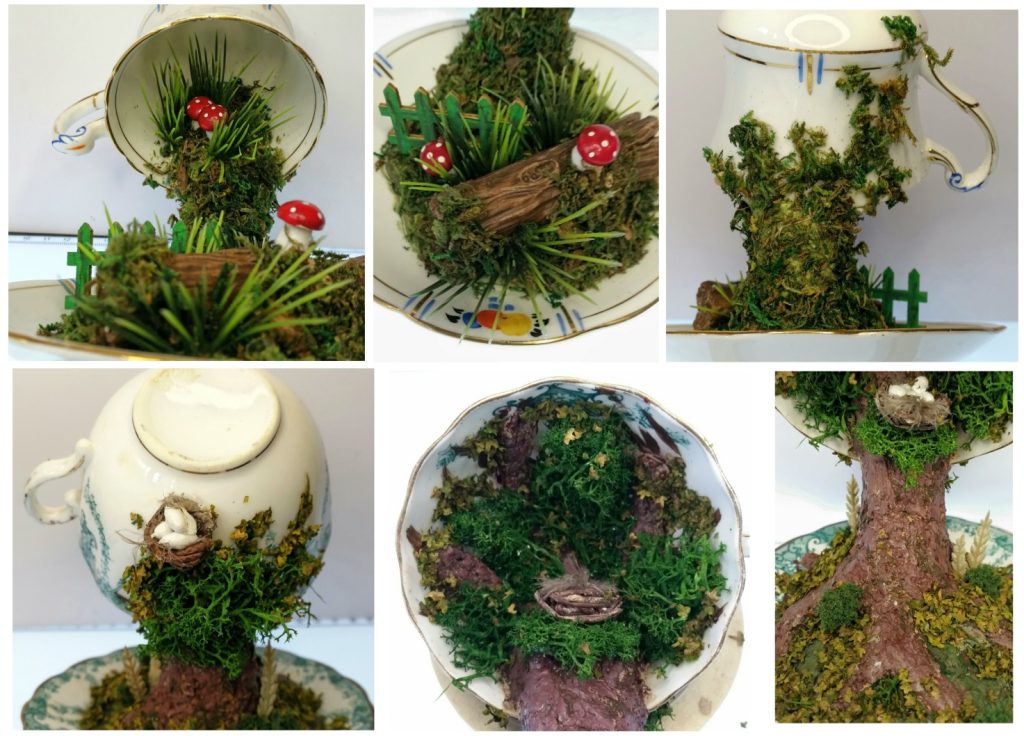
The main image on the left is decorated like a fairy glade, painting the clay green before adding fake grass all over with PVA glue including the back of the teacup. Miniature fairy garden décor were then added on with glue gel.
The main image on the right had light weight white and also wood air dry clay added. When this had dried tree branches/roots were added to form the tree shape, glued down with PVA onto the dried clay to make them stay put. The tree trunk, branches and roots were roughened up with a pointed tool to create a textured bark effect before adding darker brown paint and the areas between painted green. It was finished with a dried reindeer moss canopy glued to the inside of the teacup, miniature leaf scatter and fake grasses around the ground area. The teacup back was decorated using the same products. It was completed with added miniature nests made from wired twig picks (removing the buds to use as mini eggs) winding it around itself and in and out through any gaps into a nest shape. Small feathers and ‘bud’ eggs were gel glued inside the nest and onto the tree.

The middle main image is the simpler version to make. Using gel glue stick the bottom of the teacup to the bottom of the saucer. Add a pillar LED candle on top with a row of eggs around. Replace the eggs with flowers or other embellishments to use at other times of the year. Adding a matching painted wooden coaster underneath to house additional LED string lights (which twinkle through bone china wonderfully) really finishes it off.
The cans were cleaned and painted adding Spring flower stickers for decoration and air dry clay inside to hold up the posy. The posy is formed with curled twig picks (curled around a paint brush handle) and florist wire (curled in the same way) glued into the bottom of foam eggs. Join the arranged posy together with florist tape or double sided tape. Make a hole in the clay for the posy to stand in, glue in with PVA. To finish off add reindeer moss inside the can around the posy. The light up bottles had small eggs dropped inside, then curled twig picks, then a bottle light string fed in and around bottle sides, finished off with rope wound round the neck bottle tied with a shoelace knot.