

This month we are celebrating all things love with iris fold hearts. I’ve made the examples using recycled snail mail envelopes, repurposed map papers, origami papers and cotton ribbon. Iris folding is a popular hobby utilised in wall art, home décor, junk journaling, notebook covers, photo frames and so much more. In the past I have made personalised box frames to gift and used pretty lace on a wedding and anniversary card. WI members will be participating in show the love with green hearts, there is Galentine’s Day on 13th and Valentine’s Day on 14th; a heart shaped iris fold card certainly fits the bill for all, and I hope you enjoy the project and have a go yourself.
Iris Fold Hearts
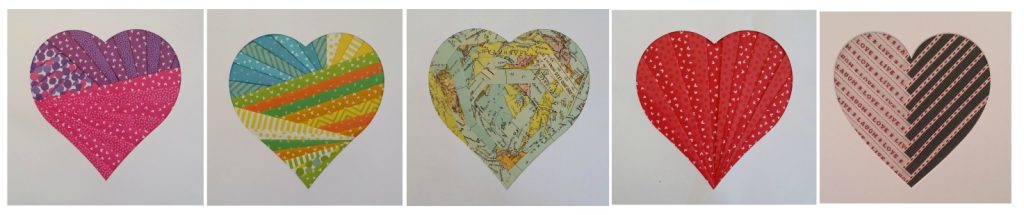
Iris folding originated in 1980s Netherlands where paper strips were arranged in a spiral pattern to resemble the iris of a camera lens. The craft spread becoming popular and still is. Iris folding is a good stash buster to use up paper scraps as well as repurposing other discarded paper products. Most of us receive snail mail where the envelopes have printed patterns inside to obscure the contents. It’s amazing the different patterns that can be formed from using what would have been discarded. February is the month of love so let’s celebrate with some heart shaped iris fold cards. In the WI world we will be taking part in the green hearts campaign, on the 13th we have Galentine’s Day celebrating our female friendships and the 14th is Valentine’s Day.
Materials:
- Iris fold pattern – free versions available online or create your own design
- Cardstock to cut out a heart aperture window to match your chosen iris fold design
- Use a die and diecutting machine if you have one, a template and cut out with a craft knife, or use pre-cut aperture cards
- Papers of choice to cut into strips, the thinner weight the better to prevent your design bulking up too much – snail mail envelopes, craft paper, map paper, cotton ribbon, origami papers etc
- The number of different designs will depend on the pattern chosen
- To create straight edges use a paper trimmer if you have one or draw lines on your paper to cut along
- Scissors, sticky tape to attach the paper strips down, masking tape to keep the template in place, double sided adhesive tape, optional bone folder to flatten down as you go
- 6×6 card blanks
Instructions:
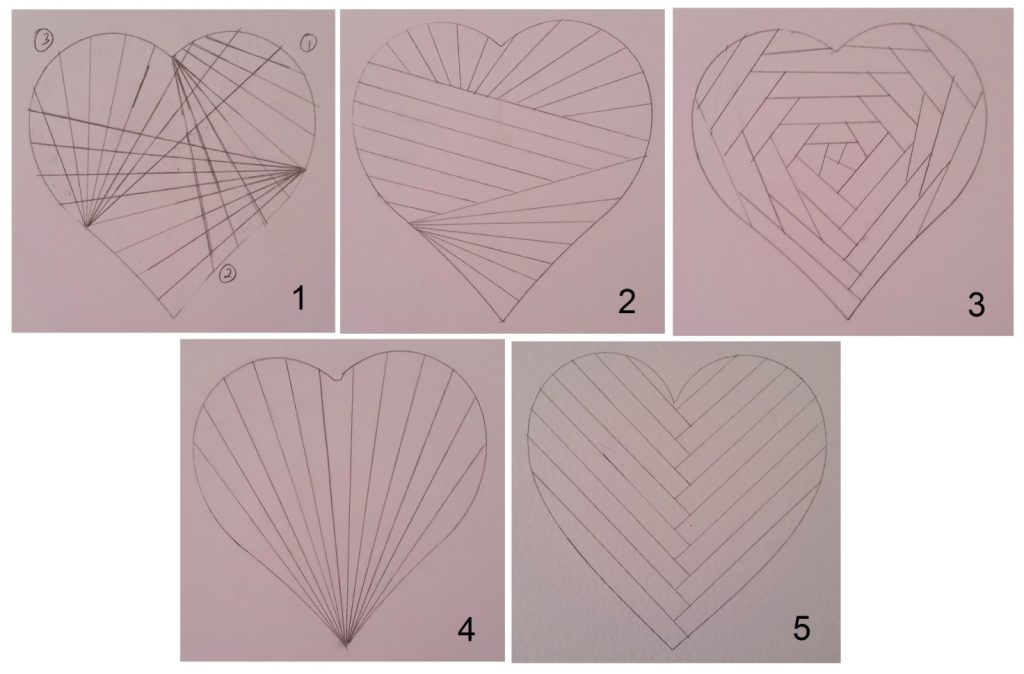
Although it looks complicated once you know the process you will hopefully find it is easy. I’ve not provided any downloadable templates as they are readily available with many free online. I created my own (see examples below) by drawing inside the aperture window and adding in pattern lines.
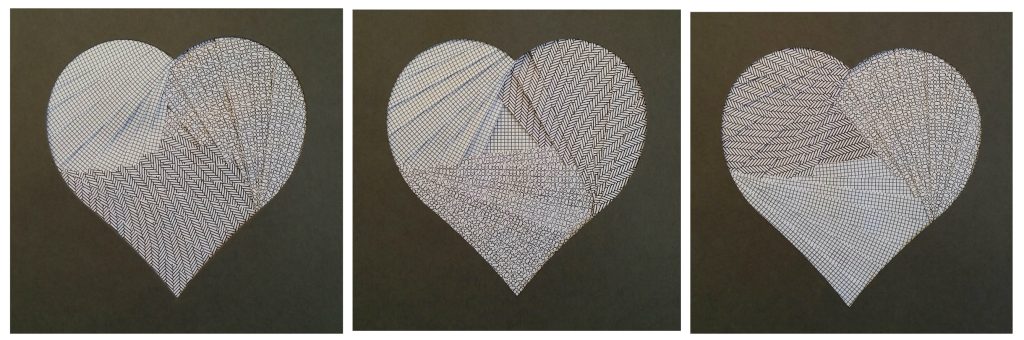
The main images are all with design 1 using paper strips from snail mail envelopes. The left was folded in order of 1-2-3, middle 2-3-1, right 3-1-2, giving just a slight difference. Designs are worked window aperture right side down with the pattern showing through the aperture, making the design a mirror image when done.
Pattern design 2 is worked bottom to top. Design 3 is worked from any point in a spiral. Design 4 is worked first one side and then opposite building into the middle leaving a centre gap to cover in paper. Design 5 is worked bottom up, one side then opposite, creating an almost log cabin pattern.
- Cut cardstock to fit the front of the card blank (or use a cut in half card blank). Draw diagonals on the back to centre the heart before cutting out.
- To create your own design, draw round the inside of the aperture window onto a piece of paper and add in guide lines using a ruler. If using a download, print twice, once onto paper to use as your pattern and onto card to cut the aperture window from.
- Cut your papers into 2cm strips. I’ve used three papers on most examples made. Cutting ‘unfolded’ strips saves time and paper, as long as the edge is straight it looks fine. Most instructions say to fold strips in half lengthways but it creates bulk. Thinner origami paper folded strips were used on the more colourful examples. Your choice!
- Separate the paper strips into piles and in the order of how you are going to use them to help work methodically without getting mixed up.
- Place the aperture window over the iris fold pattern and secure on one side with masking tape. This allows it to be lifted to check on mistakes and pattern progress.
- Attach the strips in a spiral, lining them against the pattern lines. Stick one end down with a small piece of sticky tape, tear/cut off the excess on the paper strip and stick the other end down. Flatten over with a bone folder or hands to get rid of any bulk building up.
- Continue adding strips in a spiral pattern (in the right order and overlapping the previous strip each time) until there is a small hole left in the centre. Cover and stick down a small piece of matching paper to fill it in.
- To prevent gapping and keep the strips secure add lengths of sticky tape over the back, this also helps to flatten it more.
- Flip over and reveal your beautiful iris fold design. Trim away excess paper/sticky tape showing at the edges.
- Attach to the card front with double sided adhesive tape. If it is too bulky and bulges out attach with 3D foam tape at the edges to help level it off.