

Hello August! We are now into September and Autumn is heading our way.
All the makes for September have a late Summer/Autumn feel to them, I hope you like them as much as I do. I don’t have a favourite this time as I love them all. There is a cute knitted little owl tea cosy that fits a traditional shaped small teapot. There is a hanging half bauble filled with sunflowers and other Autumn embellishments. Lastly needle felted fungi using quilting wadding as the core to needle felt around, making them quicker to complete and easier on the hands/wrists as less repetitive movements needed to get them finished. All three projects will make great home décor updates.
Autumnal Baubles
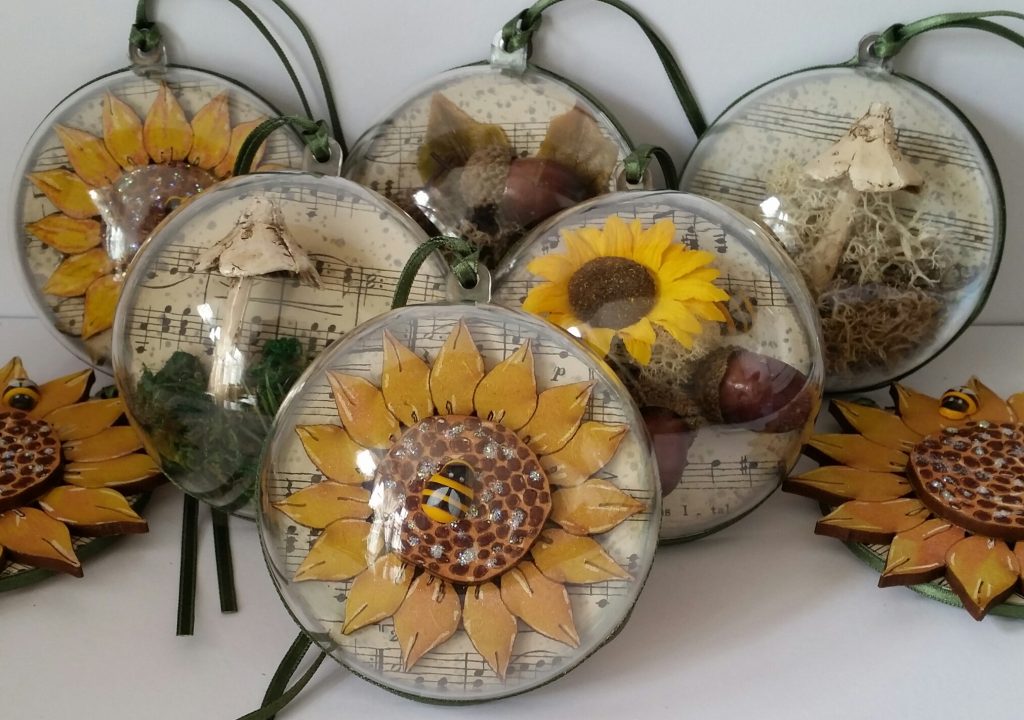
I’m sure you’ll agree Summer this year has been changeable but one thing for certain is that in September we have the official start of Autumn. I love the late blooming sunflowers at this time of year, the way they follow the sun throughout the day and their glorious vibrant colour. Hanging baubles have become popular home décor, not just for the festive season, with many having all year round ornamental branches festooned with seasonal baubles. These are a quick and easy make that can be decorated and filled with anything you choose whatever the season or reason. Only one half of a photo bauble is used for each so an economical make.
Materials:
· 8cm round wooden bauble shape, 8cm photo bauble (or any size you choose)
· Music paper (or paper of choice), pencil, ink, splatter stamp
· Tacky PVA glue, gel glue/hot glue gun, paint/opaque paint pens, glitter glue
· Scissors, sandpaper, ribbon
· Embellishments:
MDF sunflowers, small wooden bee, small resin mushrooms, reindeer moss, fake greenery/acorns, fabric craft leaves, paper sunflowers
Instructions:
1. Draw round the MDF shape on music paper. An alternative is to paint a background, decoupage an image, or paint, stamp and colour an image.
2. Cut out the shape outside of the pencil line, the excess will be sanded off for a neater finish. Add plenty of tacky PVA to the wooden bauble and spread over evenly.
3. Add the paper shape, smooth down so it is firmly stuck with no air bubbles. Leave to dry a couple of minutes then go round the edge with sandpaper to remove the excess.
4. Add a ‘splatter’ with the ink and stamp, or you could paint splatter, or leave as is.
5. Run the ink pad around the edge to distress and blur the edge of the paper. I decorated the other side in the same way but this could be left undecorated.
6. Arrange and glue the 3D embellishments with glue gel/hot glue gun/PVA leaving a small gap around the edge for the dome of the photo bauble to fit over. Leave to dry/set before adding dome. If you have a flat decorated background you could add matching ‘sprinkles’ of some sort as a lovely extra to make into a shaker bauble.
7. Add a blob of PVA glue to a non-stick/wipeable surface, leave to dry a little so it is less runny. Run the dome edge through the glue blob and place over the MDF shape. Hold in place till you can feel it is sticking. As the glue dries wipe away/pick off any excess.
8. To finish (if wanted) glue ribbon around the edge. Add a short length of ribbon through the hanging hole. The baubles are now ready to hang.
9. Sunflower painted yellow then orange overlaid on the petals. The centre painted in browns. White and black marker pen line highlights with added dots of glitter glue. There is no half dome over this version as its size was larger than 8cm but it makes a good contrast to go with the domed versions.
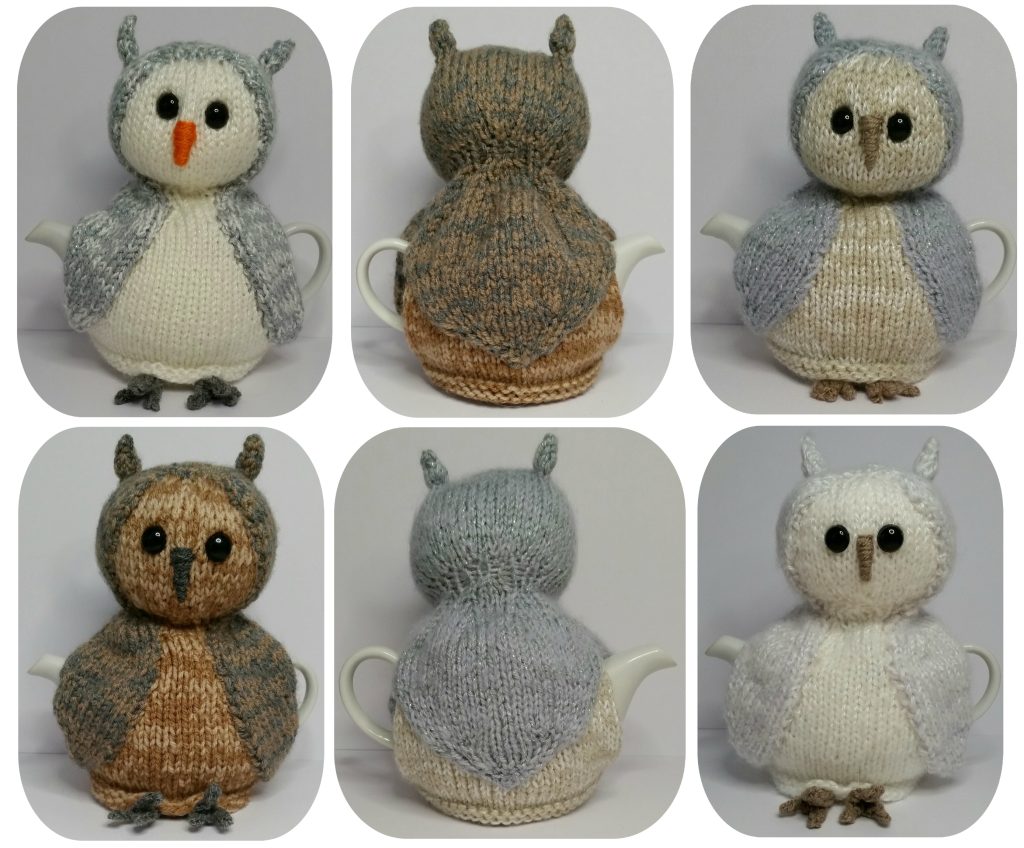
Little Owl Tea Cosy
Materials/Instructions:
Included in Little Owl Tea Cosy PDF
Owls are with us all year round but it is September heading into Autumn when they are the most active with young birds flying off looking for new homes and the older ones fighting to hold onto theirs. This is most likely why they are more associated with the Autumn months and then of course Halloween in October when they are the most vocal.
Apparently we have five species of owls living in mainland UK but I have yet to see one in real life. Owl makes are very popular I think it must be because of their large mesmerising eyes and calm regal demeanour.
This tea cosy takes only a little time from start to finish and can use up leftover yarns from other bigger projects. You could have one done in time for Halloween and others made as Christmas gifts well before the festive season. Using different coloured and textured yarns creates individual unique birds. Use contrasting colours in the same colour family to create speckled bodies and wings. Adding a fluffy yarn makes them soft and strokeable.
Feel free to knit and sell for fund raising or personal profit. The pattern is a generic owl design rather than focusing on one specific breed. I certainly had a ‘hoot’ making my small ‘parliament’.
WI Craft Blog September 24 by Gillian Cain Little Owl Tea Cosy Printer Friendly PDF
Needle Felted Fungi
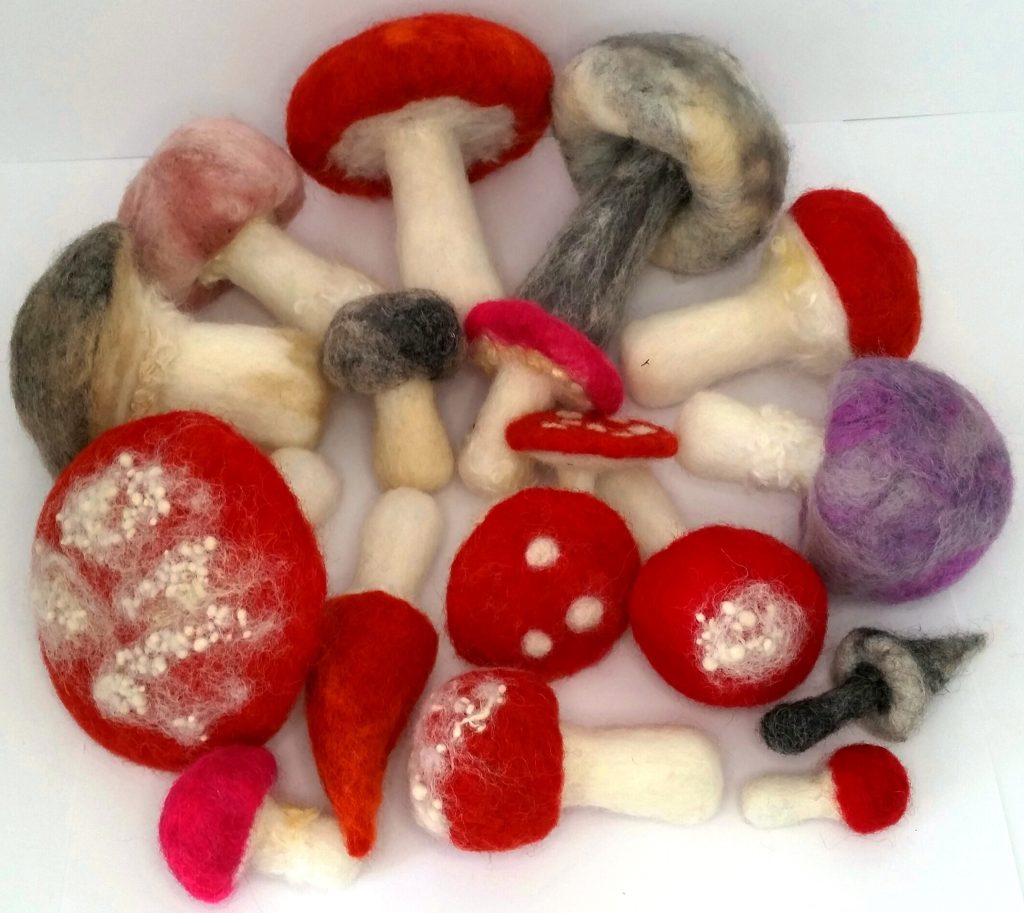
Toadstools and wild mushrooms grow all year round but the Autumn months, September to November, provide the ideal conditions for growth. I always associate them with Autumn and include them in many Autumnal makes. Here is a needle felted ‘cluster’, or ‘troop’ as they can also be known, to try out for September. They are a quicker felted make as quilting wadding has been used as the core, so less wear and tear for those with problematic hands and wrists. I might fool the neighbours and plant some outside; maybe they could attract magical garden creatures!
Materials/Instructions:
Included in Needle Felted Fungi PDF
Ideas to use below:
· Add a cluster of red and white fungi to a wreath. Attach with wire through the felted stalk and into the willow base at the back behind the greenery. Felt fabric will be glued over the wires at the back so they don’t scratch a door/window/wall when hung.
· The ‘earth’ and ‘smurf’ fungi have been added to a matching teacup/saucer as whimsical home décor. Needle felt a core shape that fits inside the teacup then hot glue it in. Needle felt more fibres over this and at the bottom of the stalk to attach and secure.
· Fungi in small painted terracotta plant pots. Fill the plant pots with air dry clay and cover with reindeer moss. Feed wire into the bottom of the stalk (leaving a length to go into the clay), glue in. Glue the other end of the wire into the air dry clay.
· The box frame has a stone wall patterned background. Fungi, reindeer moss and fake ivy leaves have been arranged and attached using gel glue.
WI Craft Blog September 24 by Gillian Cain Needle Felted Fungi Printer Friendly PDF