For the January blog we’re getting cosy! I admit to having a cushion obsession the more the better as far as I am concerned. I love a display of cushions in different textures, shapes and designs. These no sew cushions meant that I could make them all at my small kitchen table without having to set up a sewing machine station, a great help when I’m always in the middle of multiple projects at different stages spread out everywhere. As long as you have the fabric they can be made any size or shape. This style of ‘sewing’ could be adapted to make place mats, coasters, pin cushions and so many more ideas. I think a patchwork style fleece lap quilt will be made in the same way at some point in the future to match this squishiness.
No Sew Cushions
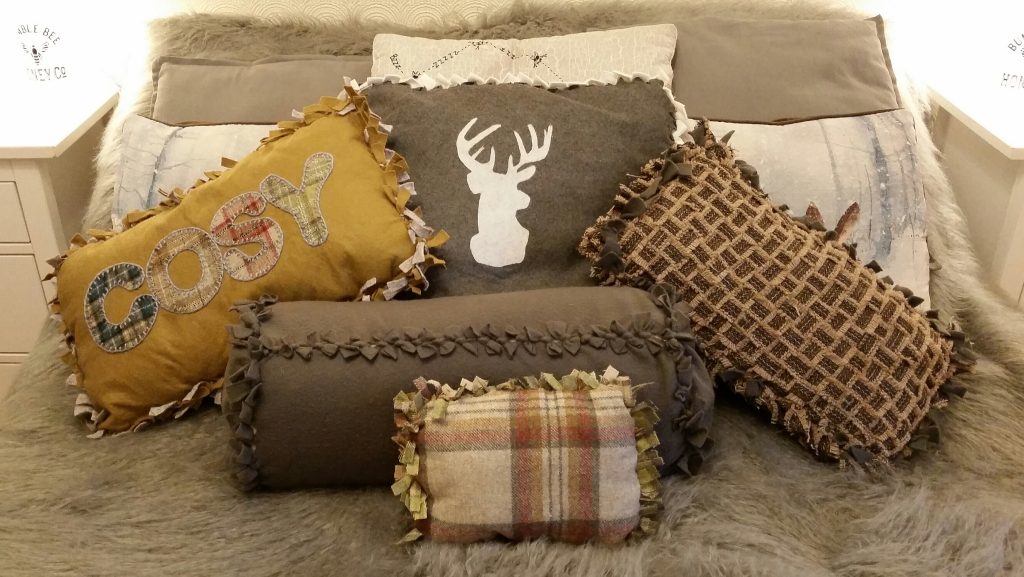
January is the month to recharge and take it easy after the festive period so let’s get cosy with some squishy cushions. With these designs there is no need to get your sewing machine out as they are either knotted or braided together. The only sewing is hand sewn blanket stitch around the applique motifs to add finishing detail.
Materials:
- Sharp scissors, large ruler or measuring tape, pins, cutting mat, quilting ruler, rotary cutter, stencil/templates
- Non-fray fabric as long as it has some weight and doesn’t mind being manipulated (I used blanket, wool/wool mix, felt, and fleece fabrics, also blanket yarn)
- Bondaweb (soft double sided adhesive web with one side backed with transfer paper for easy quick iron on bonding between two layers of fabric)
- Adhesive backed iron on fabric (I used iron on fleece for the stags head)
- Washable cushion inners as once tied together they will have to stay that way unless you have the patience to undo when/if necessary (sizes used 46x20cm bolster, 52×52 square, 32×52 rectangle)
- Toy stuffing used inside the small lumbar cushion
Instructions:
Each cushion is constructed the same way, the difference being the tying off process of the cut in strips on the edges. A great project for upcycling old blankets and fleeces.
Measure your cushion inner adding 5cm at each edge.
Cut a front and back to that size – lay fabrics out nice and flat, one on top of the other, pin together, and cut both out at the same time. I used a cutting mat, quilting ruler and rotary cutter but you can easily just use sharp scissors.
Cut 4.5-5cm squares out of each corner as shown below. Keeping fabrics together snip cuts around the four sides, 2.5cm wide, 5cm long, no need for precision as once they are tied together they all just mingle in.
Remove the pins and place the cushion inner between the two fabric layers. Test the fabrics being used for stretch and breakability as you need to tug together well so no gaps show. One of the felts I used was softer and did tear more easily so I was gentler when tying.
Take one edge strip from the top and the one in line underneath, tie together, continue around until they have all been tied. It‘s easy to miss a strip so I found it useful to pin the matching strips together beforehand.
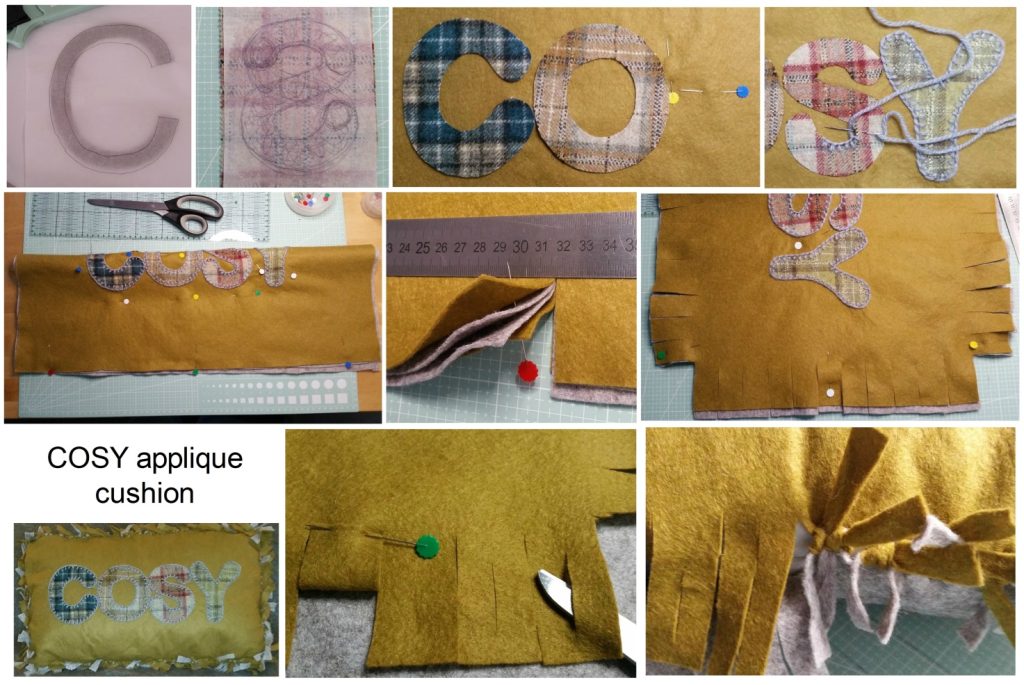
I added an appliqued ‘COSY’ to the front of the above cushion cover.
Print off (I used Arial 400 sized font) or draw out your chosen letters to trace around onto the bondaweb. If you have suitable sized templates/stencils use them. Trace the letters onto the paper covered side of the bondaweb. Draw round them as a mirror image so they read correctly once ironed on.
Dry iron onto your chosen fabric, leave to cool, cut out letters. Remove the paper backing by scraping a line in the centre with a sharp pin which makes it easier to peel away.
Find the centre point on the panel adding pins at that spot.
Place your letters in as straight a line as possible and dry iron down. I found they were lifting at the edges slightly but had already decided to blanket stitch with thick yarn around the letters.
Snip in the strips to both layers on all four sides and remove corners.
I had intended to use the braided edge given below but found the felt fabric on the bottom layer I was using, split in half on some of the strips as I was braiding, so ended up cutting all the strips in half again before tying – there’s always a solution!
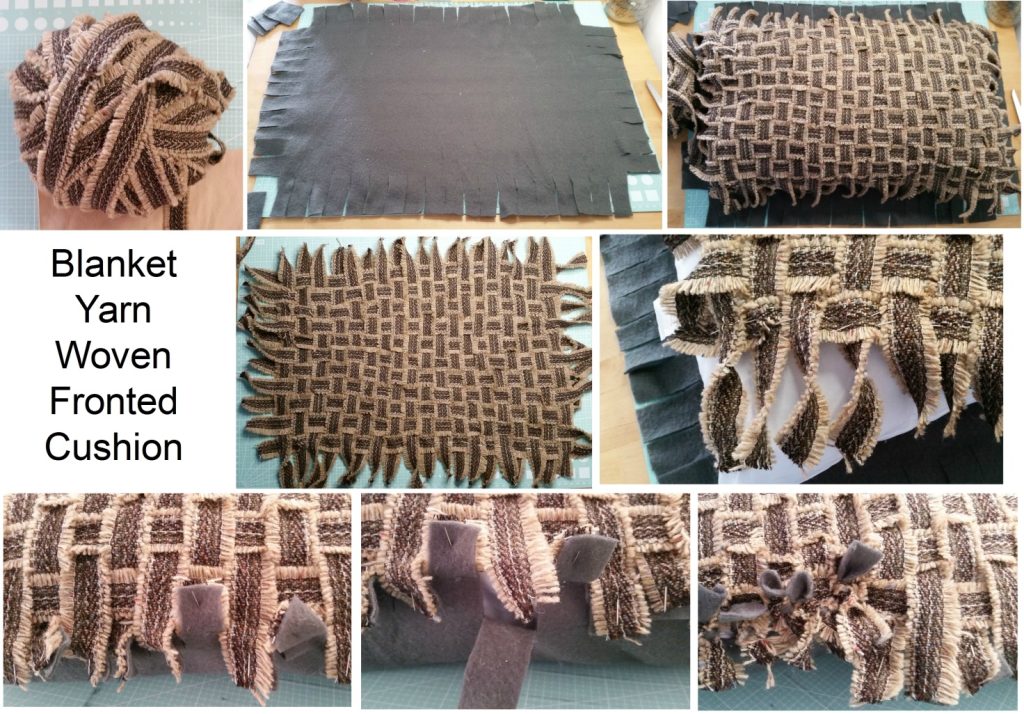
The front of the above cushion is made by weaving blanket yarn into a rectangle, tidying up when flat and pinning together to maintain its tidier shape while tying off.
Count the number of blanket yarn strips you are left with and cut that same number of strips on the bottom layer of fabric for tying together.
I decided to use the weave on just one side but it could be done for both sides. A weave could be done with cut up strips of fabrics instead of using a blanket yarn.
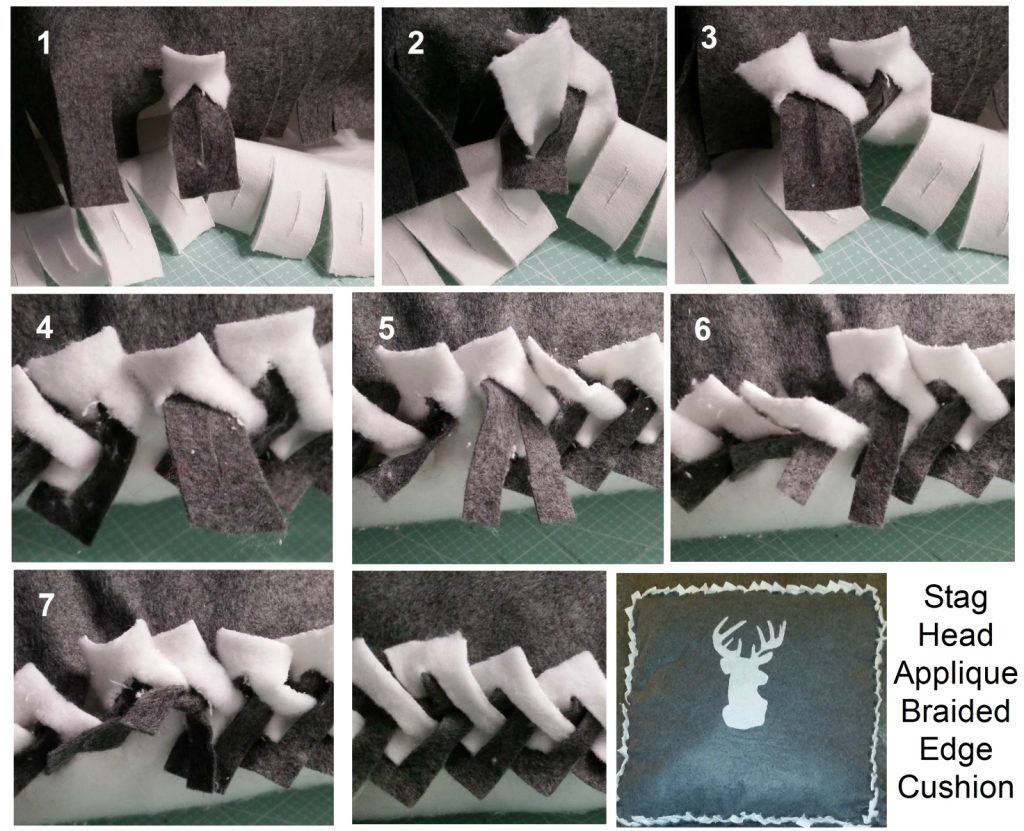
A different finish is the braided edge above instead of simply tying off. It is best done all in one go so you don’t get out of sync – very easy to do if interrupted mid braiding!
Snip in the strips as before. Fold each strip in half and snip a small hole in the centre.
Place the cushion inner between the fabrics pinning matching strips together.
Starting in the centre on the bottom edge thread the top strip through the bottom strip (see 1). Thread the next bottom strip up through that top strip (see 2). Thread the next top strip through the bottom strip (see 3). Repeat working right to left until to get all the way around.
You will have one strip left over (see 4) cut that in half lengthways (see 5). Thread the left cut half through the left side top strip (see 6) and tie off (see 7).
You are left with a lovely braided edge that will have people perplexing how it is done. It may take a few attempts to get right but can easily be unthreaded to start over. If all else fails cut each strip in half and tie off as I did on the ‘cosy’ cushion.
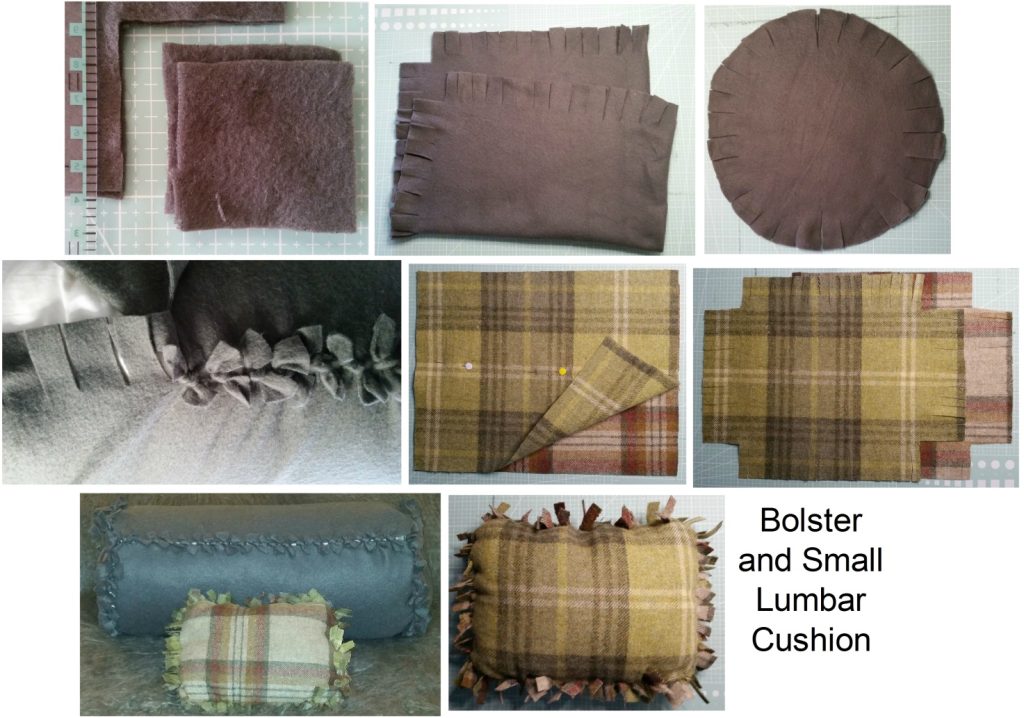
The bolster cushion is made very similar. As it is a cylindrical shape with no square sides the fabric is cut as one length, folded in half length and width ways to snip the strips in. Tying the longer sides together first.
I used a dish the diameter of the sides to cut around for the right size, counted the number of strips on the shorter sides of the main piece, snipping in that number of strips around the circle for tying together.

