
The June craft projects are all based around Garden Wildlife Week but incorporate a little of the Summer solstice, National Upcycling Day and World Environment Day.
Really they are all just nature themed in time for the warmer drier weather to enjoy as extra ornamentation in the garden.
I love seeing the bird feeding station at the bottom of the garden while looking out of the window. The cheeky birds are certainly letting us know the feeder is empty!
Despite the delicacy of the butterfly wreath it is still in one piece so I do think that beeswax waterproofing does work. Since we moved here not a lot has been done outside so it was a real joy to make all these and get them displayed outside.
The table lamp will eventually go in a planned garden room or craft shed whichever comes first!
Gillian Cain, Bowes Belles WI, Tyne & Wear South Federation
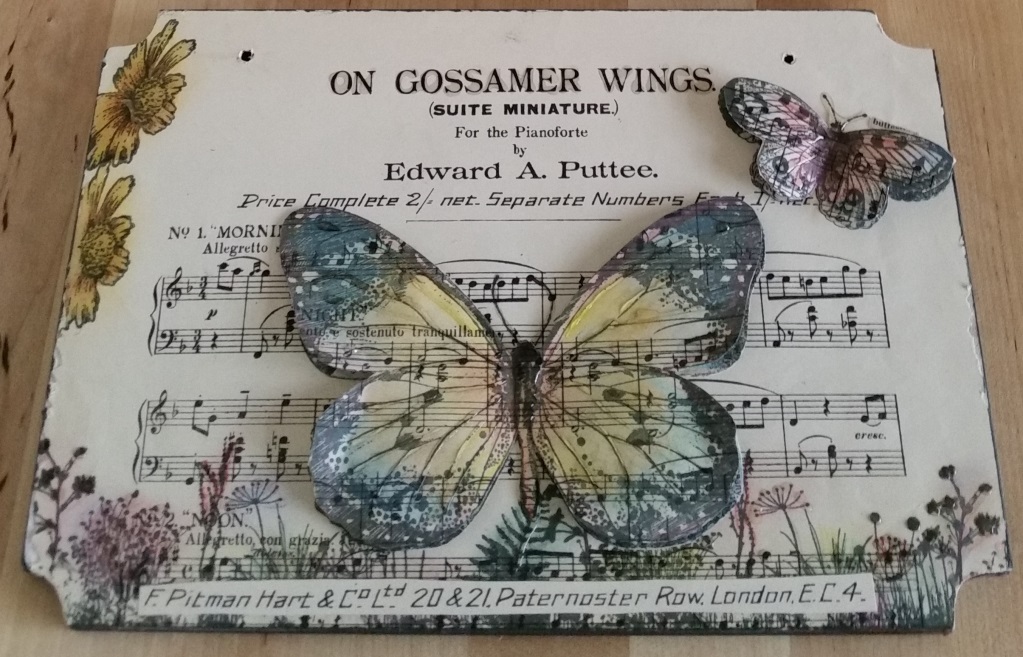
Beeswax Butterfly Wreath
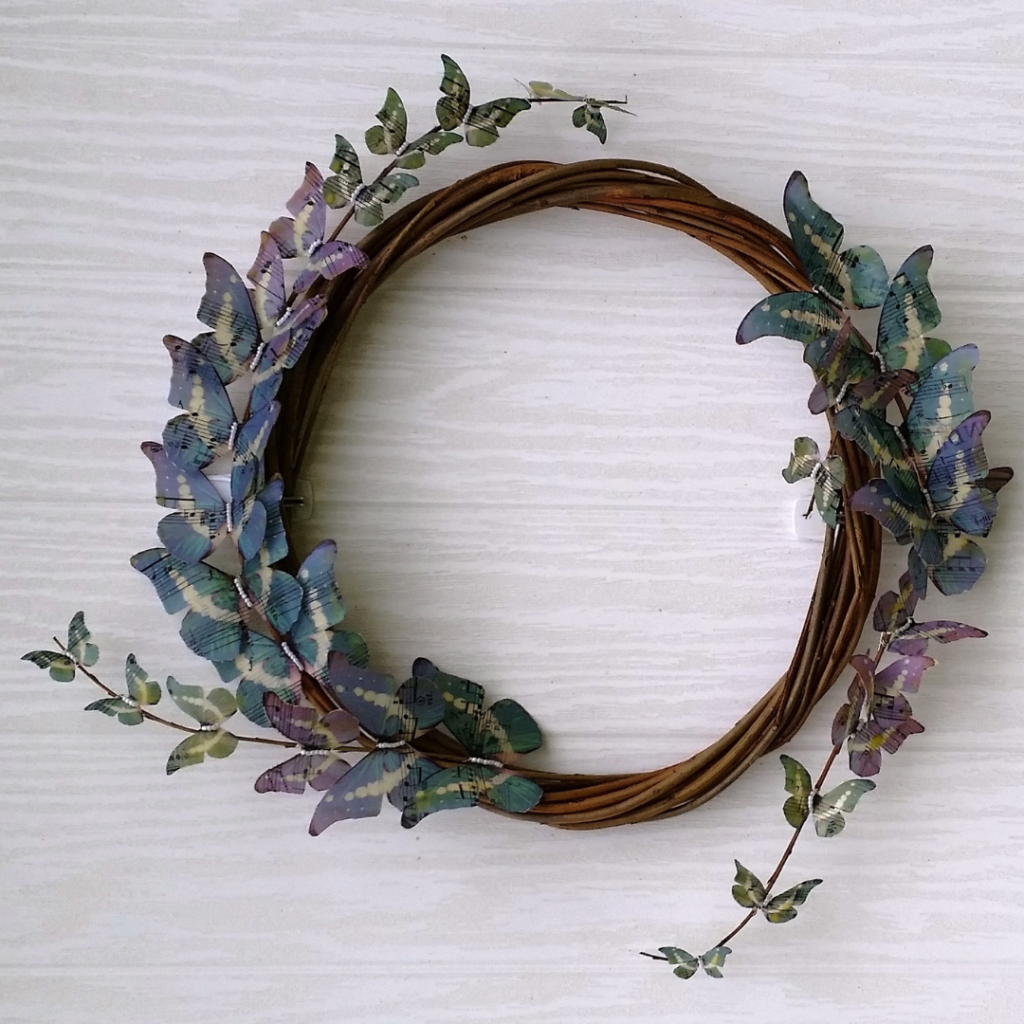
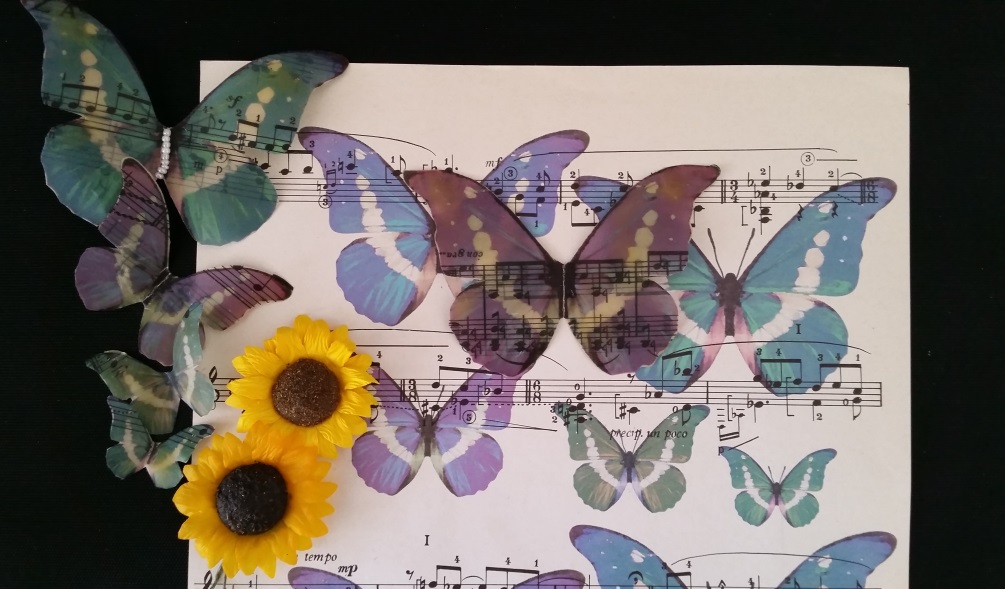
This project for June’s Garden Wildlife Week and also National Upcycling Day has left me with a very pretty and delicate waterproof wreath to display outside. I designed a full page of colourful beautiful butterflies, printed them onto vintage music paper and then dipped each butterfly in beeswax to waterproof, which leaves them with a lovely soft transparency. It is now hung in a not too sunny position, so as not to melt the beeswax which has a low melting point, and despite its delicacy is standing up to all weathers so far.
I had planned to do beeswax wraps using vintage napkins for June to tie in with The Big Lunch but found already available instructions from 2020 on the My WI website – so went the mixed media route instead – do check these out. I fully intend to make wraps along with other beeswax projects using what I have left over. I’ve found recipes for furniture polish, lip balm and so much more – not my intellectual property to share but easy to find with an internet search.
Materials:
- Natural willow wreath
- Printer, Butterflies To Print PDF document
- Beeswax pellets
- Melting pot or heat proof dish, non-stick oven liner/baking parchment
- Vintage music paper (as near to A4 size as possible)
- Tweezers, scissors, wire, small beads
Instructions:
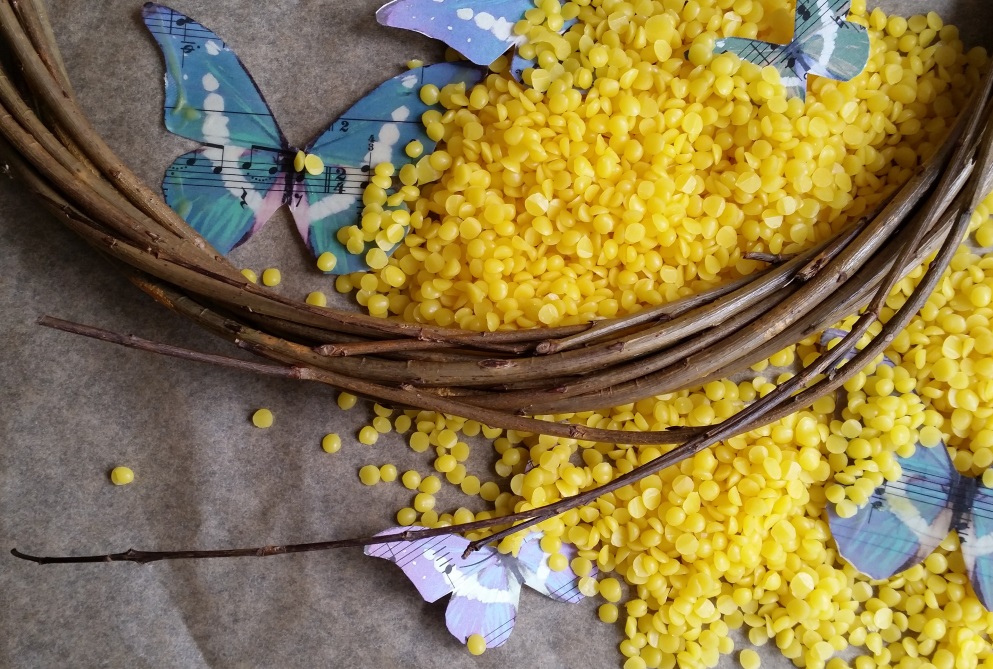
The willow wreath was locally handmade, perfectly imperfect, with branches escaping used to attach the waxed butterflies allowing them to flutter freely. My preferred beeswax was pellets but you could grate a beeswax bar instead. When melting beeswax work on a non-stick surface/cover which lets you scrape up spills to re-melt, as well as protecting your surface underneath. I used an electric temperature controlled melt pot – purposely for craft work a little like a chocolate melt pot – set at 80° which kept it liquefied while I dipped my butterflies. You could however melt in a foil container in a low oven, over hot water, or with a heat tool re-melting as it starts to set.
Print the butterfly document onto music paper (or your choice of paper). Make sure it is no bigger than A4 size; trim away any extra so it feeds through easily. They would look great printed onto book pages, acetate, and Kraft paper. A hand stamped and coloured image would be another alternative if preferred. Fussy cut enough butterflies to complete your wreath plus extra for any that might break in half when attaching with wire.
Using tweezers dip the butterflies into the liquid beeswax until fully covered, lift out and let the excess drip away. Place flat on the non-stick surface. If you have a laminator you could use that instead and sew them onto the wreath. You can see they become darker and transparent after being dipped similar to the look of glassine paper.

Cut small lengths of wire and feed on small beads for the front body. Fold over to the back, with a few twists secure together. Shape the wings with your fingers trying not to break in half; they can be brittle if overworked. Attach to the branches by wrapping and nipping the wire around cutting off any excess.
Below is a wooden plaque previously made where I’ve stamped and coloured onto vintage music paper – thought it was an appropriate titled music piece to use.
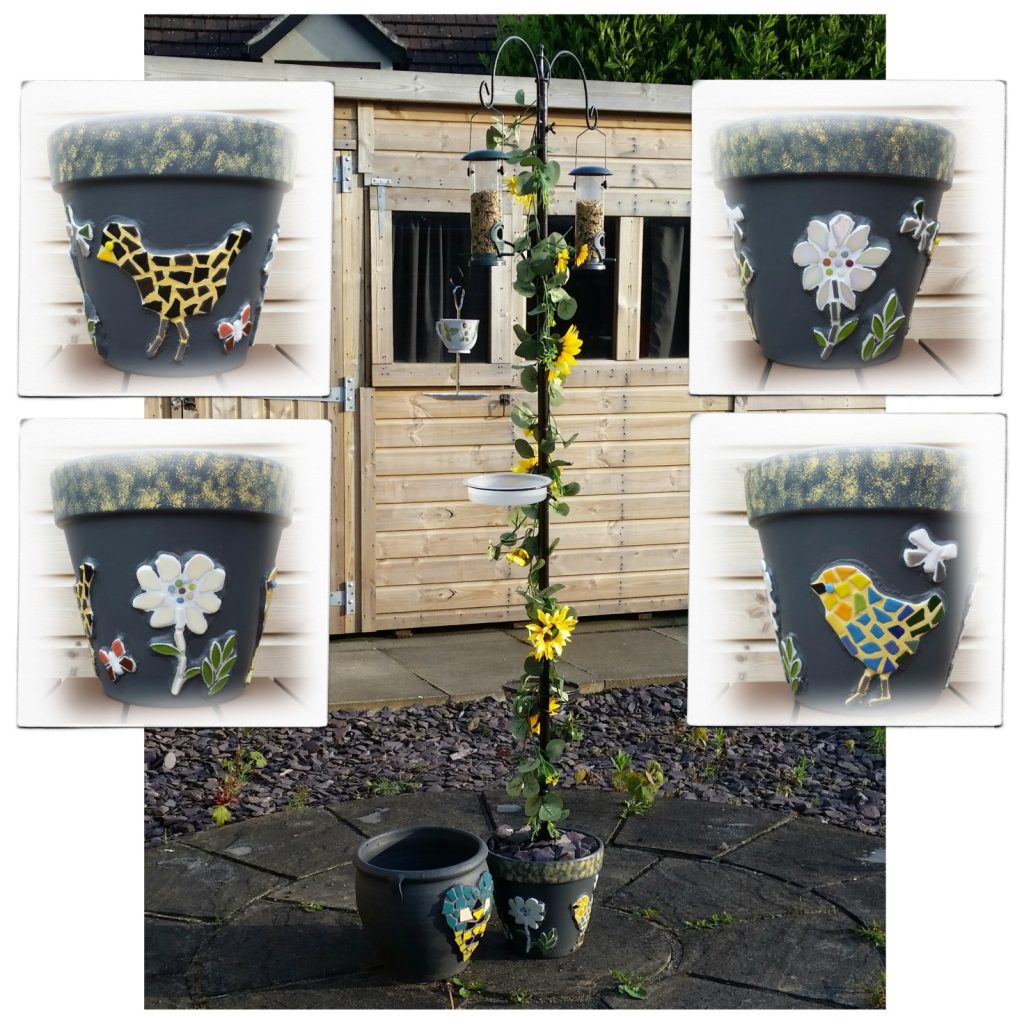
Mosaic Bird Feeder Stand
The beginning of June is Garden Wildlife Week. For the last few months we have been trying to make our garden more attractive to wildlife. We are not gardeners and don’t have much in the way of plants and flowers, only a lawn, but are lucky to have neighbouring well established flourishing gardens either side of us so we do see a lot of wild garden visitors. Last month we installed a hedgehog-tel and insect chateau. This month is the bird feeding station. A squirrel picnic table is next on the list to stop it stealing the hedgehog food.
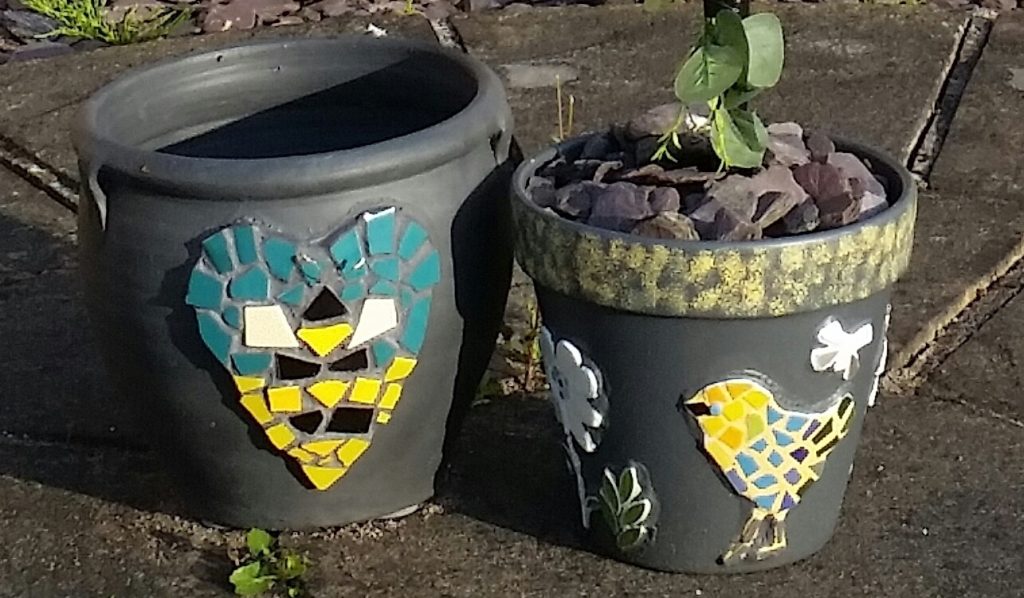
I had ordered a very heavy metal self-assembly bird feeding station and it needed a sturdy stand as wanted to be able to move it around the garden, not just stuck in one location, so I could get best bird watching optimisation. I love painting and mosaic so that was the methodology for this project and also a great way to use broken china/pottery pieces. The bird feeder is being used mostly by bigger birds so far but I have spotted a pair of robins in the area.
Materials:
- Mosaic/broken pottery/broken china pieces, fibre glass tiling mesh, PVA glue
- Large terracotta plant pot
- Grout, disposable gloves, apron, cleaning cloth/sponge, tile scrubby
- Animal friendly waterproof low VOC outdoor paint(s), sponge/paintbrush
- Metal self-assembly bird feeding station, cement, rocks/broken bricks, fake vine
Below you can see the four finished designs I chose to mosaic around the plant pot stand with, based on insects, birds and flowers and also the bird feeder in full. When working with a non-flat surface it is easier to glue the mosaic pieces onto tiling mesh first before attaching, making it easier to grout as well. It is important to follow the instructions as grout is slightly caustic and can cause damage to skin and surfaces, so wear gloves, old clothes or apron, and cover all work surfaces.
Assemble all mosaic pieces and arrange in your chosen designs. Using PVA glue stick to the tiling mesh and allow to fully dry. Cut your designs from the mesh leaving a small edge.
Mix your grout according to the instructions. Spread over the back through the mesh making sure to fill all gaps. Press onto the plant pot firmly adding more grout, smooth down taking off excess. Wait 15 minutes and remove excess grout with a dry cloth/paper towel, after another 30 minutes clean with a damp cloth/sponge. Leave to fully dry.
When fully dry clean properly removing dried on grout with a damp scrubby. Paint the plant pot. I used two coats for better coverage and stippled the rim with a contrast colour. I decided to paint the grouted areas after that to make the images ‘pop’.
Cement the spoke of the bird feeder inside the plant pot, supporting it vertically as it sets, it was done on a really sunny day so did not take long. I added shingles over the cement for additional weight and left for 24 hours before adding the actual feeding dishes and moving to its spot.

The bee heart pot will soon have a transplanted conifer added. I have other large pots to mosaic and paint up in a folk artsy way over the summer in different colourways. Our garden may not be green in the conventional sense but it will be colourful and a real delight by the end of summer.
June 2024 – Gillian’s Instructions for Mosaic Bird Feeder Stand
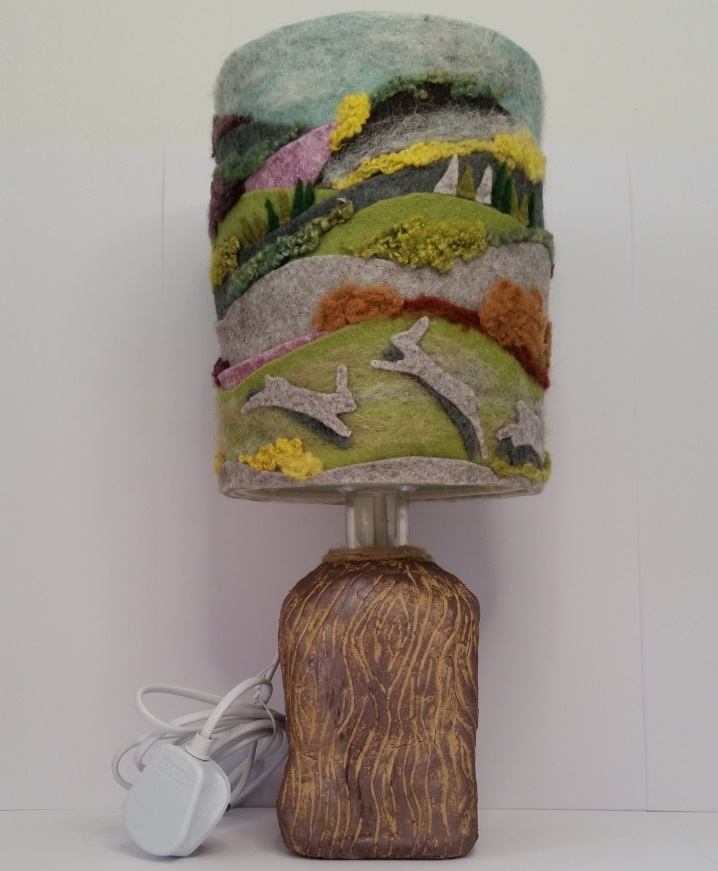
Nature’s Garden Table Lamp
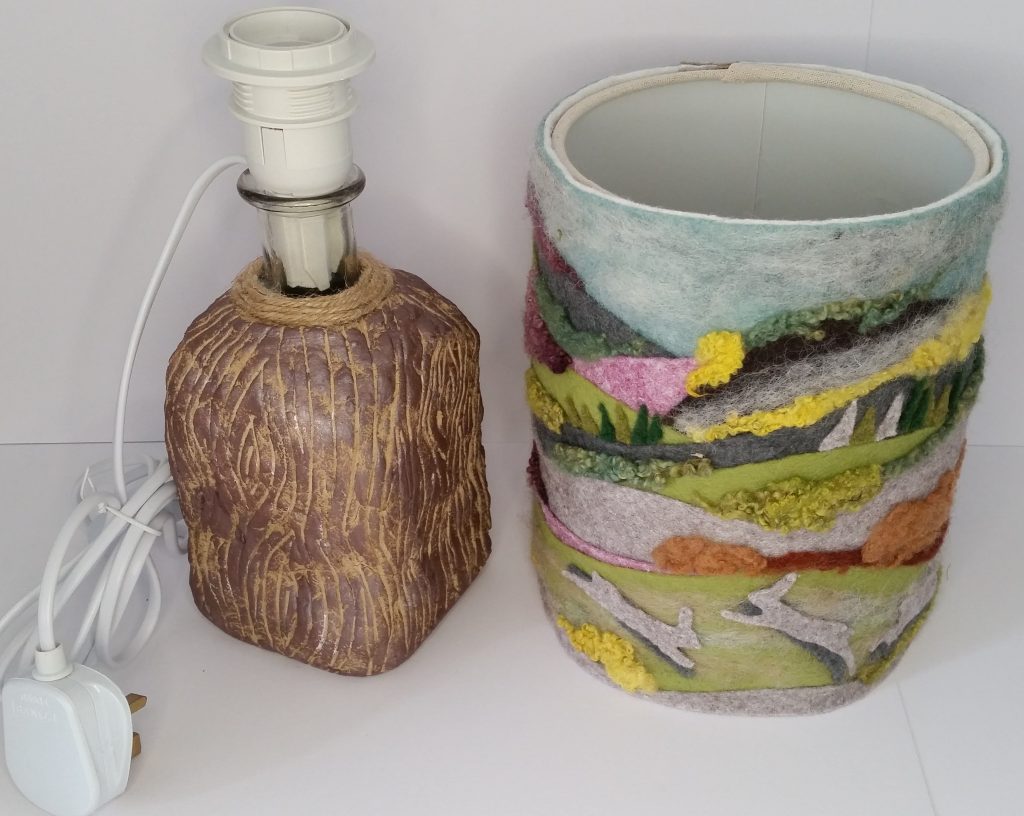
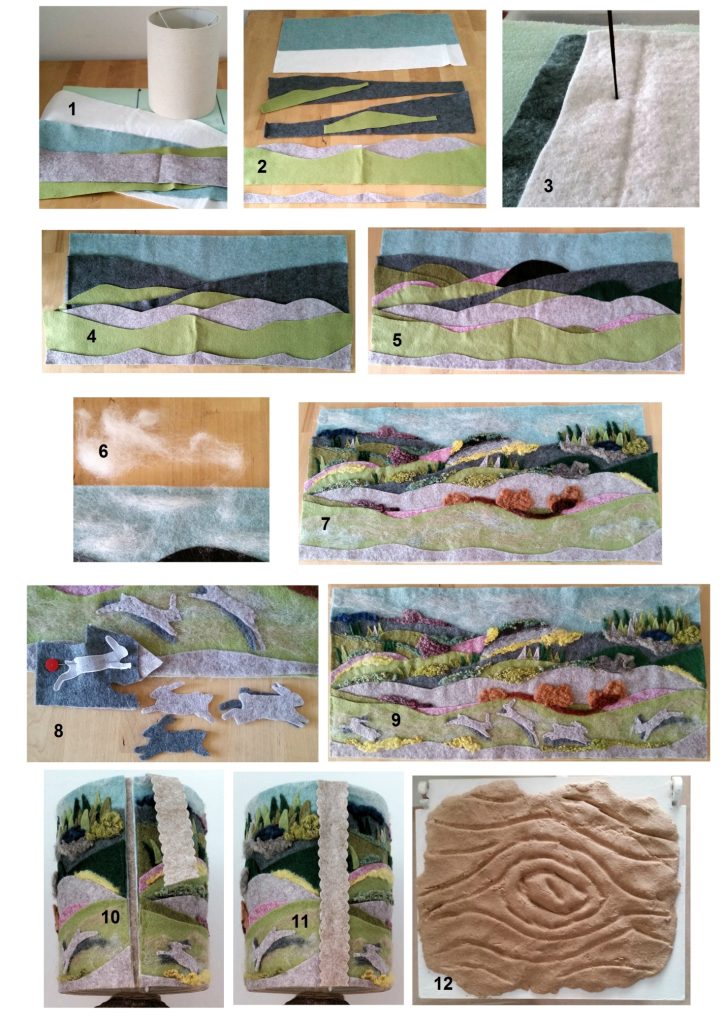
The beginning of June is Garden Wildlife Week. During the month we also welcome the Summer solstice, National Upcycling Day and World Environment Day. This project incorporates elements from all of these, my inspiration being a regular journey through a Global Geopark area of natural beauty and wildlife. I’ve upcycled a small lampshade with a needle felted felt fabric cover and wood clay covered bottle. The lamp holder bottle adaptor used makes it an easy conversion.
Materials:
- Cylindrical lampshade – 20cm high, 50cm circumference – but any could be used
- Wool content felt fabric (cut on the roll), additional scraps
- Felting mat/sponge, felting needles, felt fibres, wool locks (curly felting fibres), scissors, animal outline/template, hot glue gun
- Recycled bottle, air dry wood clay, twine, lamp holder bottle adaptor
Instructions:
- Measure lampshade and cut ‘backing’ felt fabric to wrap around plus extra, particularly the width as it shrinks considerably after needle felting. I added an extra 5cm which still left a 1cm deficit when finished.
- Decide on your main landscape colourways for size and position as you layer them over each other before cutting and shaping. Cut/shape strips to fill along the ‘backing’ piece. Some will end up covered so can be shorter in width as shown to tuck underneath. I started with blue for the ‘sky’ planning the remaining layers over this. The trimmed pieces after shaping were used as another layer.
- Needle felt the layers one by one (easier than multiples), starting with the blue all over particularly the edges. Needle felt from the front then the back to create a good join, the needle felting acts as ‘glue’. You can tell it is attached as other colour fibres will show through. If preferred sew on the layers in an applique fashion or with fabric glue.
- Lay the main layers over the backing. Needle felt from top layer down until lightly attached.
- Add smaller layers between to build up, tucking behind the main ones. Needle felt until all are firmly attached.
- Add felt fibres to the sky to create clouds.
- Add felt fibres and wool locks to the landscape for added texture.
- Add wildlife. I added hares, fussy cutting round a pinned printed template on scrap felt, plus a duplicate shadow underneath.
- Add small ‘tree’ triangles from scraps and needle felt or stick on with a small blob of hot glue. Needle felt wool locks to create greenery, bushes and far off woodlands. Needle felt the hares or stick on with small blobs of hot glue. Add detail until you are happy with how it looks, an option is to embroider details.
- Square off to neaten and fit your lampshade. I had a gap but had already planned to add a strip knowing the layers would not match up because of shrinkage. Cut a strip for underneath, hot glue one edge to this, place over the lamp shade and glue the other edge bit by bit to the strip. It is not glued to the lampshade directly.
- Cut an outside strip, hot glue as before and trim off excess.
- This gives an idea of what the air dry wood clay looks like before refining. It feels and looks like cork, very easy to carve into and sticks to most surfaces without glue. Tear pieces of clay from the block, press onto the bottle until smoothly covered. Carve a preliminary design with a blunt tool, leave to dry before refining. Finish with twine hot glued around the neck. It was easy to create a wood bark and knot effect but decided looked better with added brown paint to highlight the texture.
Match with some felt flowers and framed smaller panels for a lovely display. Wool is the traditional gift for a seventh wedding anniversary, a small panel on a card would not only be a lovely card but could be used for home décor display afterwards, a card and gift in one.