As promised the August craft blog has Jewellery Craft part 2 with more advanced techniques and makes, along with a guide, to start you on you jewellery making journey.
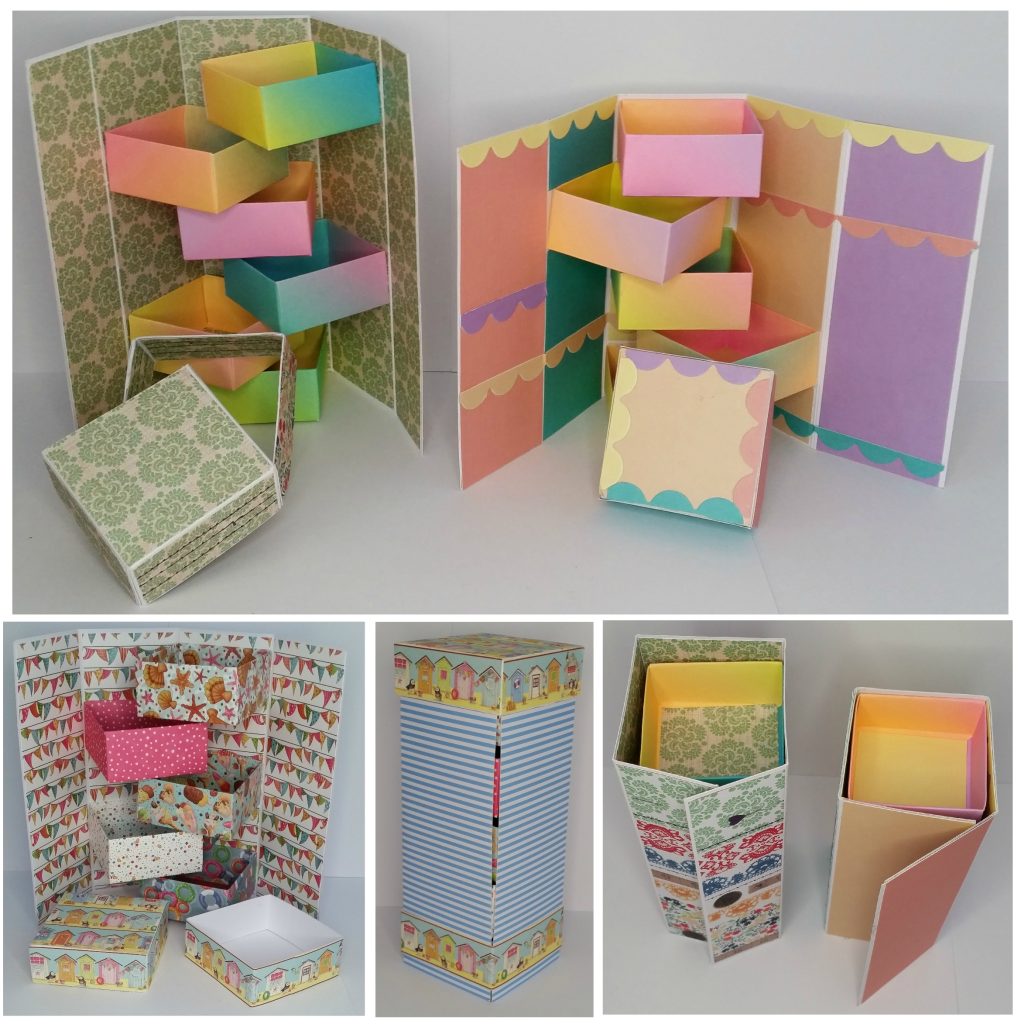
I kept with the jewellery craft theme so there are instructions for kirigami paper boxes to gift and display your makes in. Then I’ve used the boxes inside a jewellery box tower which is great for storage and display. A good trio of ideas and makes on a theme I think!
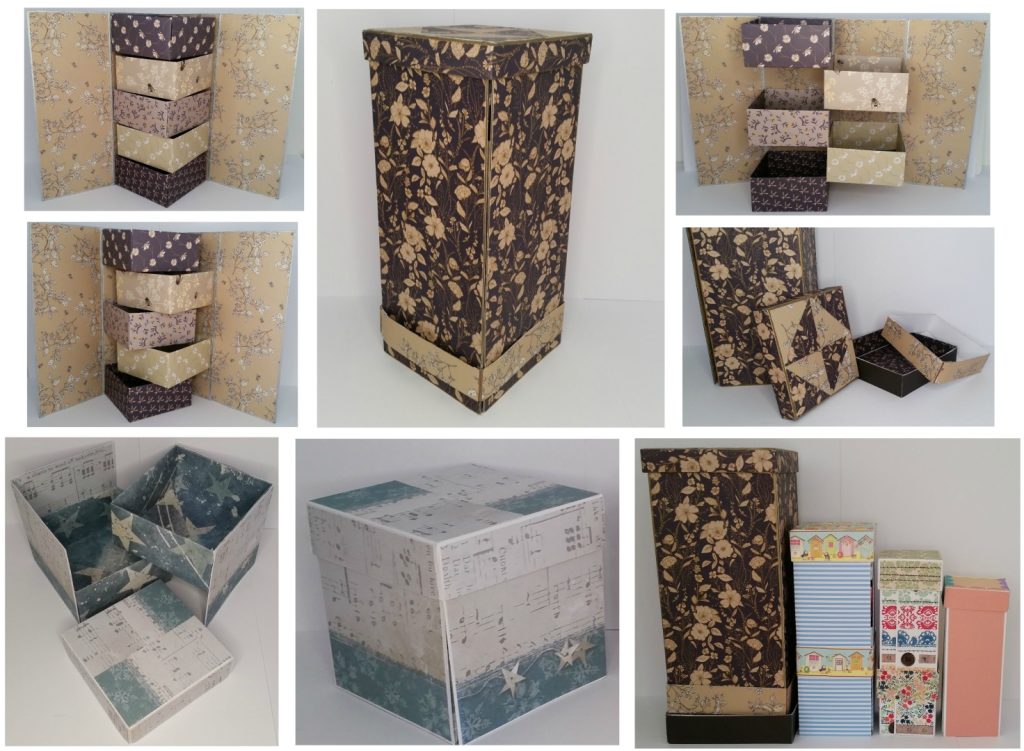
Jewellery Box Tower
Another pairing to run alongside ‘Jewellery Craft Part 2’ is this fold out tower to use as jewellery storage and display, or whatever else you want to use it for. Made from construction weight card, pretty craft papers and kirigami boxes it can be made to match your décor/theme. A nice idea for craft markets as you can display items when opened and then simply fold away to store till next time. Accuracy in measuring/cutting is the key for a good snug fit and finish….measure twice, cut once!
Materials:
2 sheets A4 card 250-300gsm
Craft paper – 6 sheets for the 6×6 boxes – 3 to 4 sheets 8×8/12×12/A4 papers to decorate
Ruler, pencil, scissors
Bone folder, score board (or use embossing tool and ruler), paper trimmer (or use scissors)
PVA dries clear glue
Instructions:
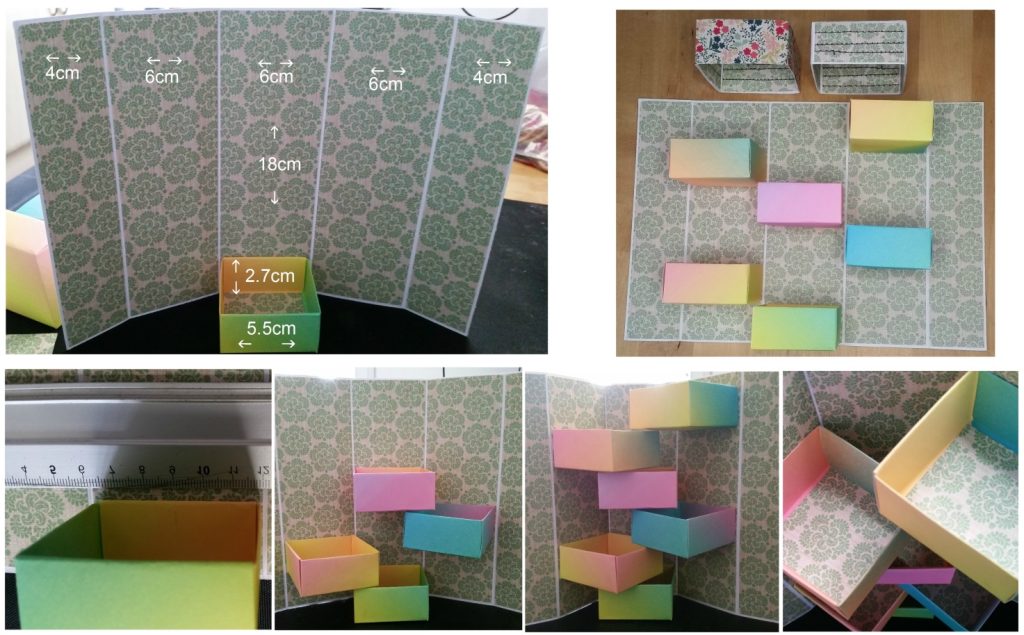
The instructions are for the tower, top left on the main image, which is a good size to start with. This used 6 boxes from 6×6 papers (finished dimension 5.5cm wide, 2.7cm high). Measurements were calculated around them, adding 5mm to the panel width and just under 2cm to the height to factor in gaps between.
Trim A4 card to 26x18cm.
Score and emboss lines at 4cm, 10cm, 16cm and 22cm, creating five panels giving a crossed over gatefold style front. Fold and firmly crease score lines with a bone folder in both directions to create good movement and crisp edges.
As I used white card I added panels of craft paper to decorate the inside and outside, 3.8×17.8cm for the end panels, 5.8×17.8cm for the centre ones. Glue down as shown above leaving a white border over the scored/embossed edges.
Make sure you have sufficient matching papers to complete. Leftovers will be used to decorate the lid and belly band. You could use coloured/patterned card removing the need for craft paper.
Glue the kirigami boxes to the inside as shown above starting with the bottom one first. Add a generous amount of PVA to one side of the box and press down till it holds, making sure it is level. Leave a minute or so for glue to set a little between adding boxes.
Position the next box, I found it helpful using a ruler and drawing a short line where it should be glued, placing the bottom of the box on that line.
After each box is added and glued, open/close up the tower to make sure it is opening freely without boxes catching on each other and they are still level before the glue fully sets.
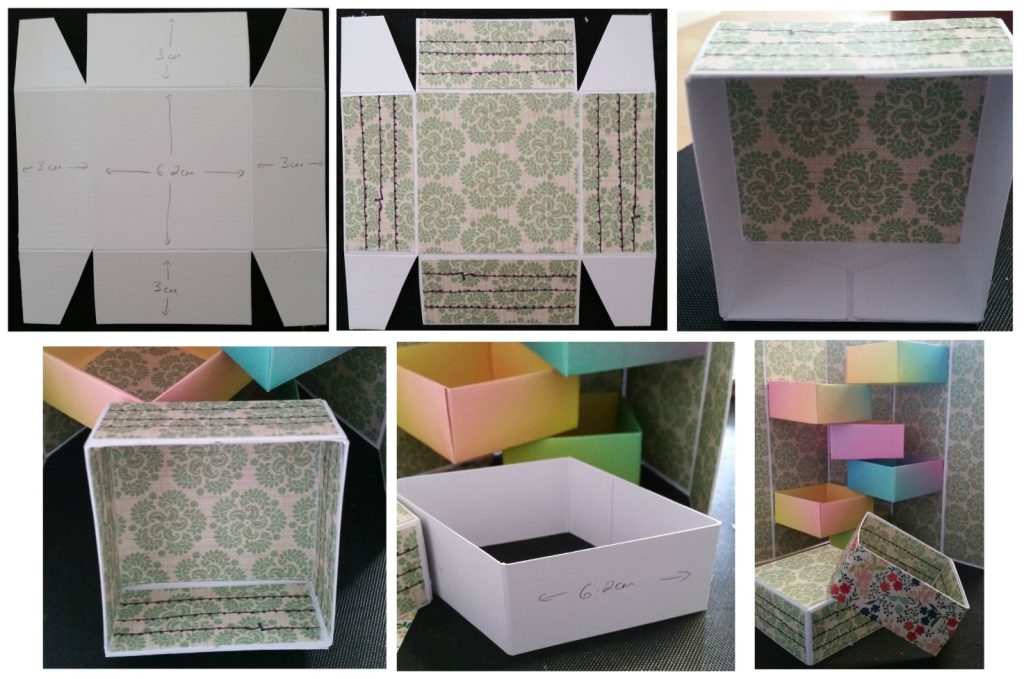
Make a lid from a 12.2cm square of card. Score at 3cm on the four sides, fold and crease well with a bone folder. Cut notches in as shown.
While flat glue panels of craft paper to the top, 5.8×5.8cm for the centre, 2.8×5.8 for the sides.
Glue in the notch cut corners and leave to set a little before adding craft paper panels (same size as before) to the inside.
I’ve added a belly band for the bottom of the tower to keep it closed. Cut a long 3cm wide strip of card from the leftover A4 card. Score at 6.2cm intervals and fold to create the four sides, trim off excess leaving 2cm to glue together inside as shown above.
Cover with strips of leftover craft papers inside and outside.
Instead of a belly band you could make another lid to stand it in.
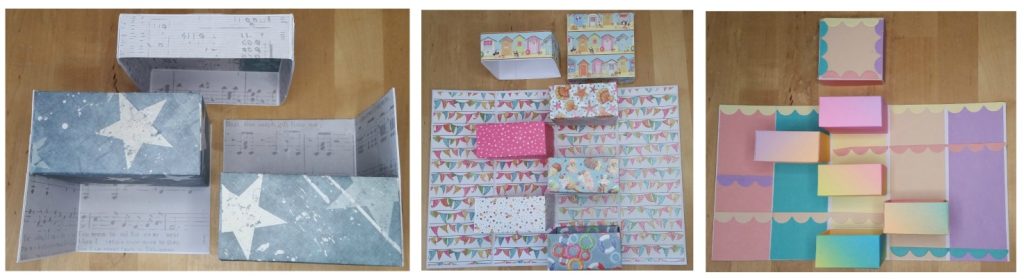
Above and below are other variations you could try. Just remember to plan and work out all measurements beforehand for the style/size of tower you want before cutting into card/paper. I’ve used 12×12, 8×8 and 6×6 paper kirigami boxes to make the different sizes. The larger they are and depending on how many boxes inside you will have to add overlaps to join together. For larger versions you will need 12×12/A3 card. Patchwork your leftover scraps instead of cutting into a new 12×12 sheet as I have done for the lid of the black/gold box below.
To run alongside ‘Jewellery Craft Part 2’ I thought showing how to make your own boxes from paper would be a good pairing. Handmade craft paper boxes have been one of the most useful things to know how to do in my craft ‘arsenal’ and not only for jewellery. I’ve made boxes for handmade fudge and other confectionary, spirit miniatures, small cakes and many other things as the need arises. Once assembled they are fairly robust and a much cheaper option than ready-made bought in versions. It is kirigami not origami, as it has been folded and cut (kiri) from paper (gami) then glued to create a 3D design; origami is purely folding a flat piece of paper to 2D/3D.
Materials:
Craft paper pads of choice – 12×12 (just over 30cm2), 8×8 (just over 20cm2), 6×6 (just over 15cm2) – two sheets per box (The greater the gsm the more robust the finished box will be, I used mostly double sided (pattern on both sides) 150-200gsm)
Pencil, ruler, scissors, paper trimmer (optional), bone folder
Strong glue stick or dries clear PVA
Instructions:
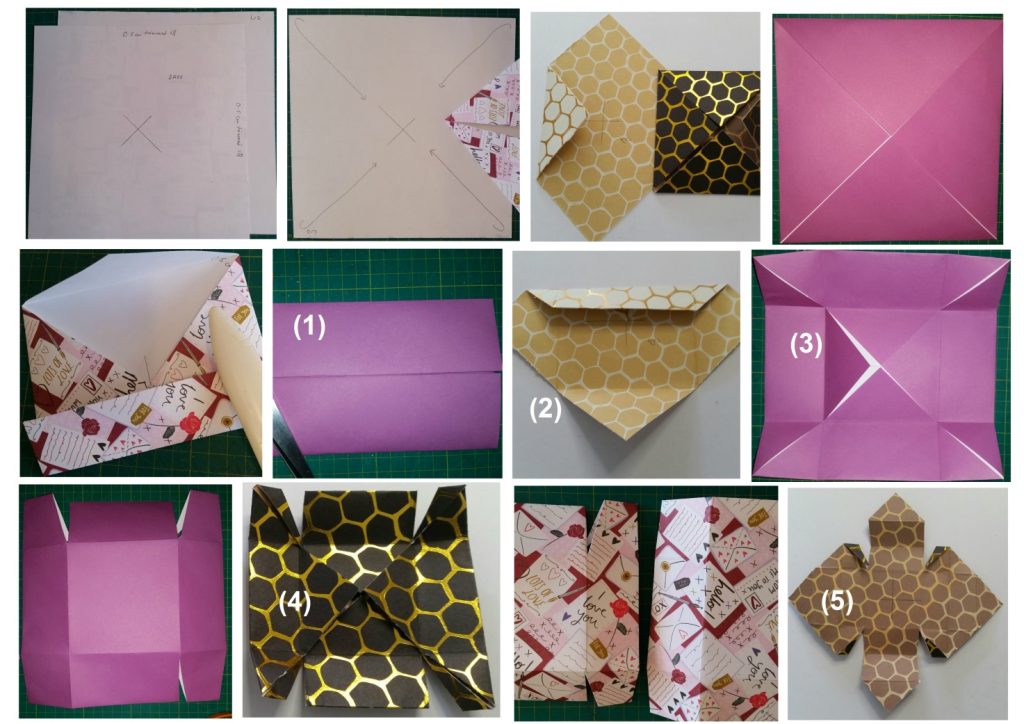
The box base should be 5mm-1cm smaller than the lid, 5mm for a snug fit, 1cm for looser fit. Size difference is less noticeable with 5mm; mark the underside of the base with B and lid with L so you know which needs to be manipulated inside the other when assembling.
Trim two adjoining sides (not opposites) with a paper trimmer, or mark lines to trim with a pencil and ruler cutting away excess as straight as possible with scissors.
With a ruler and pencil draw two diagonal lines from opposite corners, the point where they cross is the centre to fold into.
Fold each corner to the centre ‘X’. Crease and firmly press the folds with a bone folder (or bowl of a spoon as a suitable substitution).
Create the box sides by folding all four edges into the centre where the points meet, crease and press the folds well. You can align opposite sides as shown in (1).
An alternative is to unfold completely, fold the corner back into ‘X’ then fold over the sides as shown in (2) to the ‘X’.
You will have well-defined crease marks showing box sides and points matching up in the centre (3).
Cut notches in on opposite sides as shown in (4) to take away bulk. It is better to cut from the top as you can see the fold lines easier especially with patterned paper.
Unfold as shown (5).
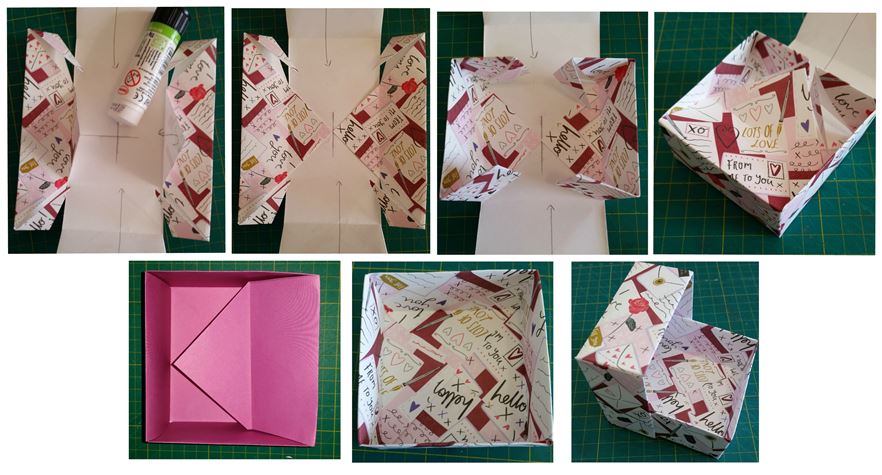
Add glue to the bottom square. Fold down the uncut sides where the corners are still intact and stick down with points together.
Bring up the sides of your box folding in the corner flaps at right angles creating a box shape.
Fold one cut side over the corner flaps onto the bottom and stick down, then the other side. The points should all meet in the middle, if not glue a square of card/paper over the bottom to disguise.
Additional tips:
When trialling a new paper fold to save wasting craft paper, practice with copier paper first.
If using lesser gsm paper, the bottom/lid can be reinforced using a square of card/paper glued inside.
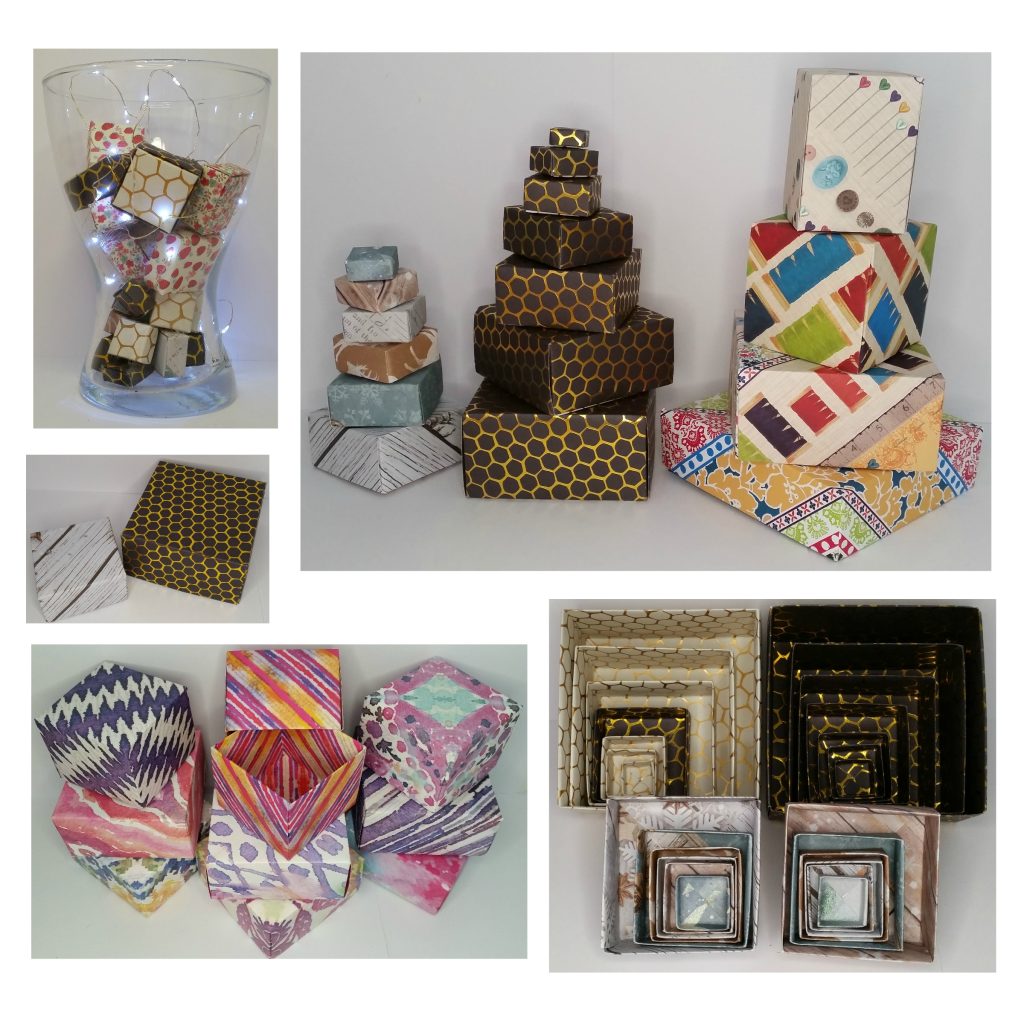
Any size box is possible by cutting down your craft papers even creating a set of stacking boxes as shown in main image. The black boxes in the main image (top to bottom) were made from squares of 5.5cm/8cm/10.5cm/15cm/20cm/25cm/30cm, remembering to trim the base.
Use leftover scraps for tiny boxes to display in a dish or vase with twinkly lights.
Using the same instructions make a flat box from 12×12 papers, instead of folding sides into the ‘X’, mark sides at 4cm and fold sides there. For a cube style box mark side folds at 7cm (which goes over ‘X’) and fold there.
Folding sides to the ‘X’ creates a box a third in size of the actual paper measurement, 302cm paper creates a box 10.5cm square, 202cm paper 7cm square and 152cm paper 5.5cm square.
This is a cost effective idea to run as a crafty session with your WI.
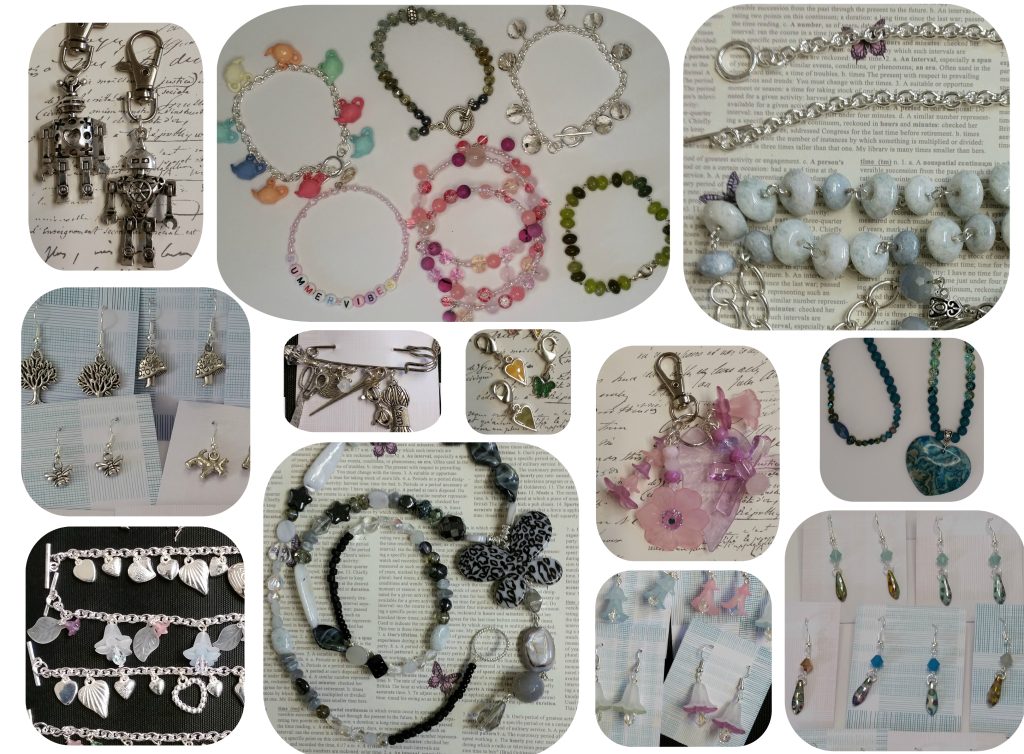
Just add ideas, beads and charms of your choice and enjoy the learning process
The PDF guide itemises the most common findings and how they are used but there are many variations, too many to mention, plus so many other different findings for different uses. It really is up to you what you might want to make. Sometimes it is a good idea to buy a kit or boxed set first to see if this is something to continue with as they come with all the items necessary apart from pliers.
Jewellery is a personal preference, I like big, bold and quirky. There is always a good presence of jewellery businesses and makers to get ideas from and of course to purchase from.
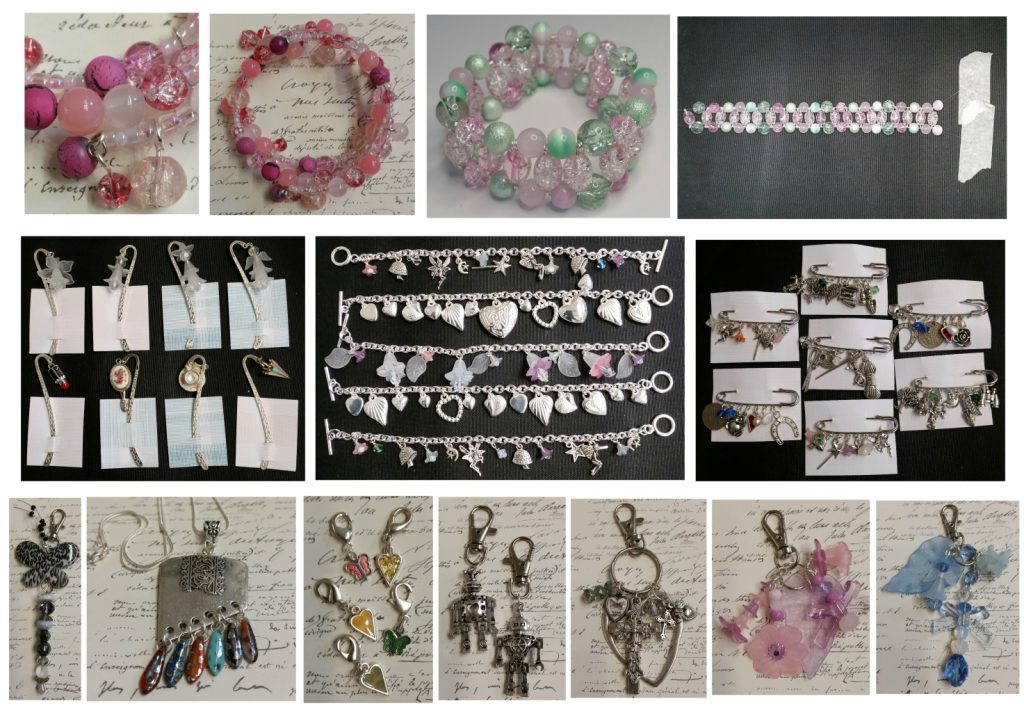
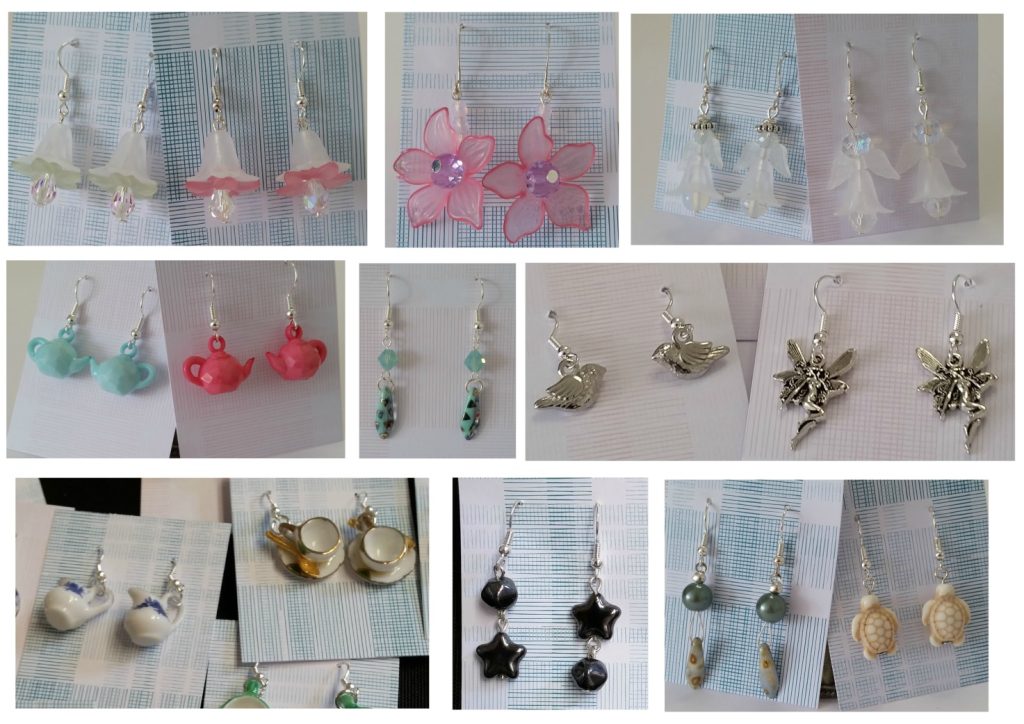
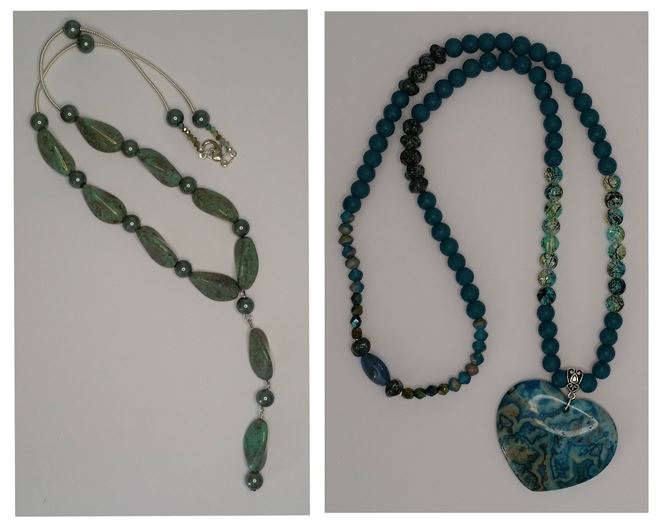
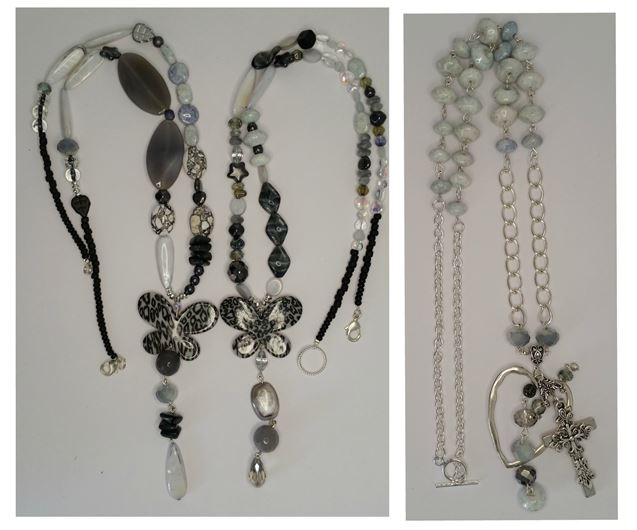
Below I’ve shared ideas for a different elasticated bracelet to last month using beaded links on eye pins, that have been strung through both ‘eyes’ with elastic and a bead in between each link to make a bangle style. There is memory wire bracelet which has bead drop dangles interspersed throughout its length and on the loop ends. There are book marks, charm bracelets, kilt pins, zip pull/handbag charms. Earrings using Lucite and other beads, charms and dolls house miniatures, the possibilities are endless. I find earrings sell really well. Extra-long necklaces strung on beading wire, with the addition of chain, dangles, charms and beaded links. I hope something inspires you to have a go.